Introduction
Overview
Teaching: 15 min
Exercises: 0 minQuestions
What is M3?
Objectives
M3 or ManeFrame III is a supercomputing cluster: a set of powerful computers that are connected to each other. It is built and maintained by Southern Methodist University.
M3 was built in 2024 to replace the retired cluster ManeFrame II (M2) and has been having several updates.
The M3 is maintained by 2 teams: a team of system administrators, who work directly at the cluster, and monitors its hardware and operating system, and a team of HPC Applications, who work with the SMU M3 users. The two teams work very closely together. As HPC Application services, we provide training workshops, online help and support.
We maintain a very extensive website which hosts plenty of information for M3 users. We have more than thousand of people using M3 everyday; they come from a variety of departments: Computer Science, Mathematic, Physics, Chemistry, Engineering, etc. M3 accounts are free for all SMU faculty, staff, and students.
Key Points
M3 an main HPC cluster at SMU
Accessing the M3 Cluster
Overview
Teaching: 15 min
Exercises: 0 minQuestions
How can I access the M3 cluster from my local machine?
Objectives
SSH client, Terminal, Open OnDemand
M3 is accessed using the SSH (“Secure shell”) protocol. M3 runs the SSH server; on your local machine, you will need to run SSH client which connects to a server using a command-line terminal. The commands that are entered on the terminal are processed by the server on M3.
To start the SSH client, you can open the Terminal Application (in cursor) and run the following:
ssh your_username@m3.smu.edu
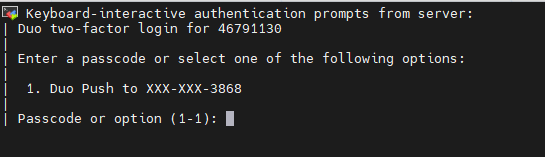
At this stage, you will be asked to enter your username and password, then DUO option. Note: when typing in password, due to security, you won’t see anything on the screen. So make sure you type the password correctly.
When logged in, you are presented with a welcome message and the following “prompt”:
[username@login01 ~]$
The prompt in a bash shell usually contains a ($) sign, and shows that the shell is waiting for input. The prompt may also contain other information:
this prompt tells you your username and which node you are connected to - login01 is the “login” node. (There are total 5 login nodes on M2)
It also tells you your current directory, i.e., ~, which, as you will learn shortly, is short for your home directory.
Key Points
M3 can be accessed by an SSh (secure shell) client
Terminal using cursor.com
Open OnDemand platform
The structure of the M3 Cluster
Overview
Teaching: 15 min
Exercises: 0 minQuestions
What is the structure of the M3 Cluster?
Objectives
compute and login nodes, hardware table
The computers that make up the M3 cluster are called nodes. Most of the nodes on M3 are compute nodes, that can perform fast calculations on large amounts of data. There are also several special nodes called the login nodes; they run the server, which works like the interface between the cluster and the outside world.
The people with M3 accounts can log into the server by running a client (such as ssh) on their local machines.
Our client program passes our login credentials to this server, and if we are allowed to log in, the server runs a shell for us.
Any commands that we enter into this shell are executed not by our own machines, but by the login node.
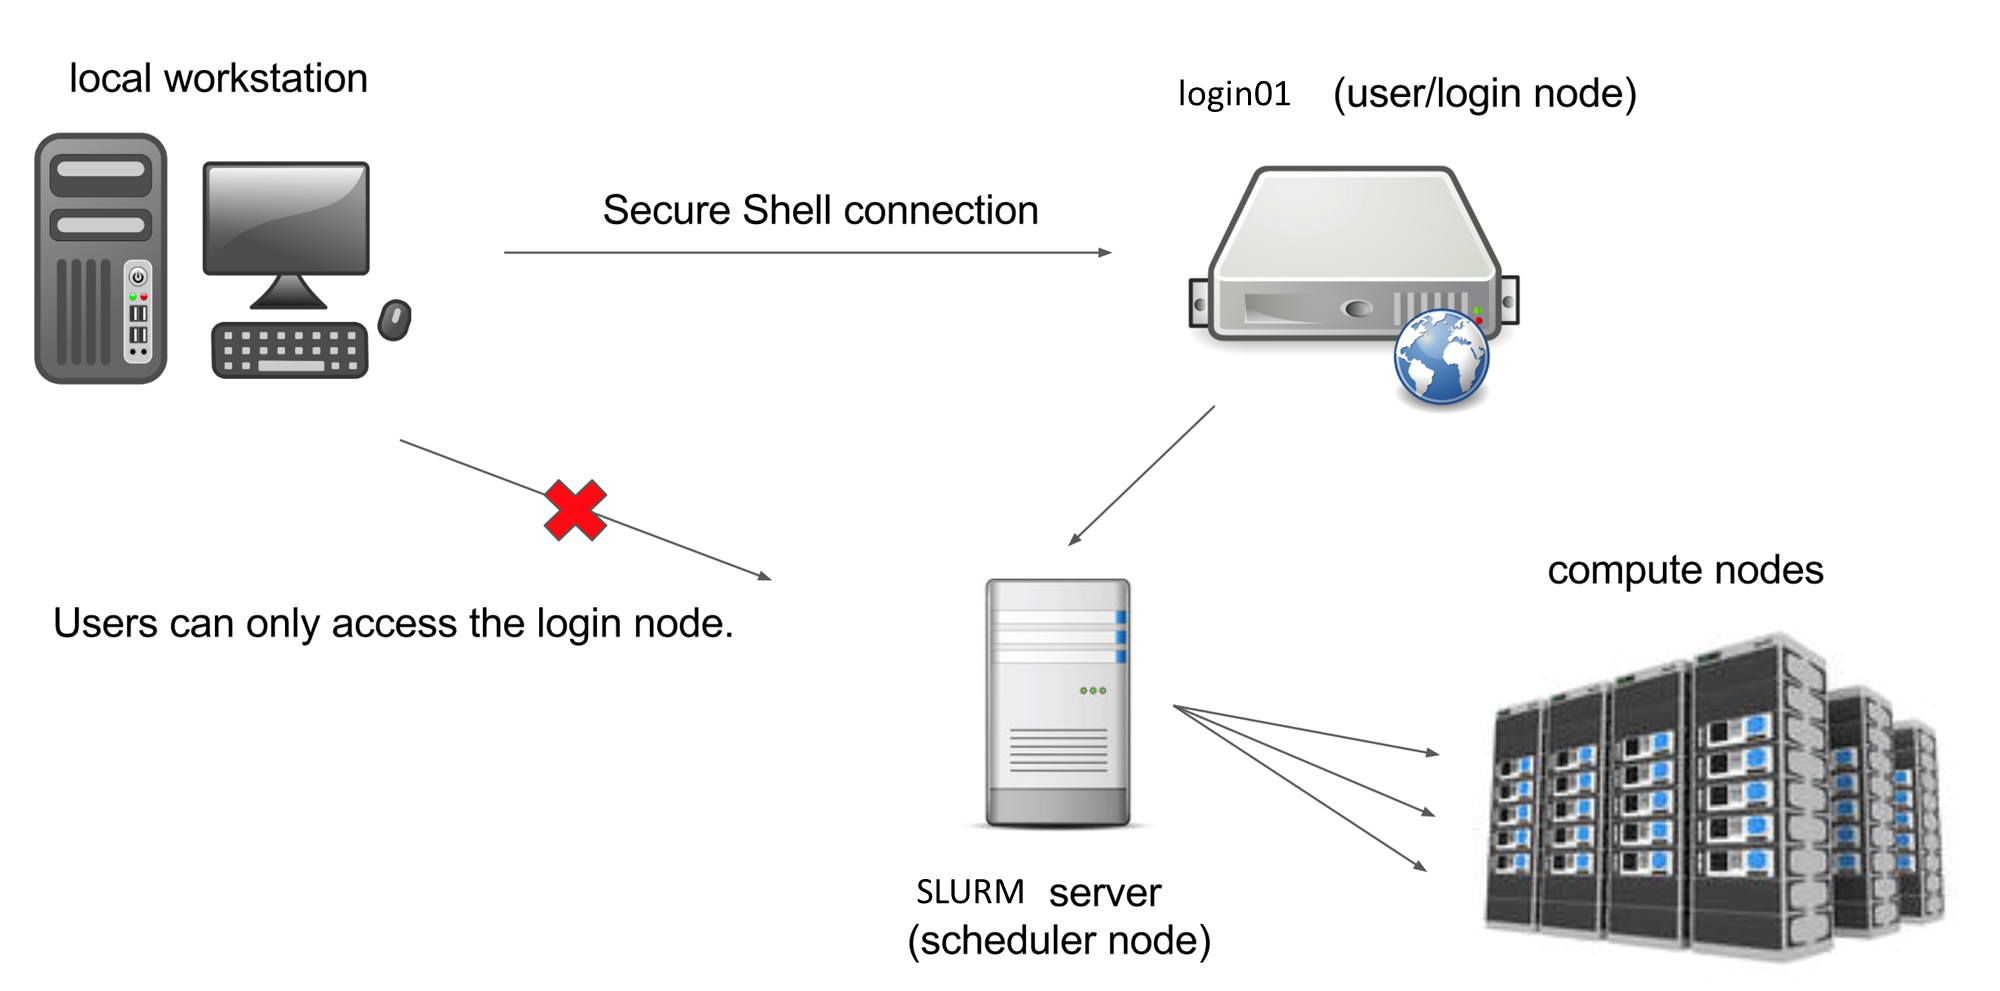
Another special node is the scheduler; M3 users can get from the login node to the compute nodes by submitting a request to the scheduler, and the scheduler will assign them to the most appropriate compute node. M3 also has a few so-called “service” nodes, which serve special purposes like transferring code and data to and from the cluster, and hosting web applications.
To see the configuration of nodes, max memory and walltime in each of the partition (queue), you can type
sinfo --Format="PartitionName,Nodes:10,CPUs:8,Memory:12,Time:15,Features:18,Gres:14"
To see which nodes are available at the moment, you can type
cat /hpc/motd/m3_queue_status
This table shows the amount of different queues, number of running jobs, waiing jobs and idle nodes. The number of idle nodes per each queue are completely free node: a node which has, for example, 8 cores, but only 4 of them are used, would not be counted as “free”. So this table is a conservative estimate. This picture can change pretty drastically depending on the time of the day and the day of the week.
In brief:
- 170 standard compute nodes with 128 cores, 512 GB memory and 200 gb/s infiniband
- 8 high memory (2TB) nodes with same bandwidth
- 3 nodes with 8 NVIDIA V100 GPU (gpu-dev queue, 2 hours walltime)
- 5 Virtual Desktop nodes (VDI) for Remote Desktop, can be configured in Linux/Windows OS.
- All clusters’ nodes are interconnected with high speed infiniband network 200 gb/s
Key Points
M3 contains more than 178 interconnected compute nodes
a specialized login node runs the SSH server
Storage on M3
Overview
Teaching: 15 min
Exercises: 0 minQuestions
How and where can I store my files?
Objectives
home directory, scratch space
Every M3 user gets 200 Gb of storage space; this storage is backed up at the end of every day. So if you accidentally delete a file that was created more than a day ago, we might be able to restore it. This storage is called home directory, used to store your installed program and data
When you log into M2, you end up in your home directory. To see which directory you are in, type
pwd
…which stands for “print working directory”. It should give you something like
/home/<your username>
200 Gb might be enough for some, but for people dealing with extensive amounts of data that would not be enough and they are encouraged to use the Cold Front allocation storage
To go to a scratch directory, or to any directory on M3, use the cd (“change directory”) command:
cd /scratch/users/<your M3 username>
To go to your home directory, you can do
cd /home/<your M3 username>
There is also a shortcut; to go to your home directory, you can simply type
cd
Key Points
users get 200 Gb of backed-up storage in their home directories
Users get access to Cold Front allocation work storage
scratch storage is not backed up
Transferring files to and from M3
Overview
Teaching: 15 min
Exercises: 0 minQuestions
How can I transfer data between M3 and my local machine?
Objectives
WinSCP, FileZilla
command line (via terminal)
Another option for advanced Mac and Linux users is to use the scp command from the terminal. Open a new terminal, but don’t connect to M3. The scp command works like this:
scp <path_to_source> username@m3.smu.edu:<path_to_destination>
For example, here is the scp command to copy a file from the current directory on my local machine to my home directory on M3 (tuev is my M3 username:)
scp myfile.txt tuev@m3.smu.edu:/home/tuev/
… and to do the same in reverse, i.e., copy from M3 to my local machine:
scp tuev@m3.smu.edu:/home/tuev/myfile.txt .
The . represents the working directory on the local machine.
To copy entire folders, include the -r flag:
scp -r myfolder tuev@m2.smu.edu:/home/tuev/
Transfer file via hpc.smu.edu
Key Points
Windows users can use WinSCP for file transfer
Mac users can use FileZilla
In terminal, use scp (secure copy via ssh)
Running an interactive job on M3
Overview
Teaching: 15 min
Exercises: 0 minQuestions
How do I request and interact with a compute node?
Objectives
srun,modules
Now, we arrive at the most important part of today’s workshop: getting on the compute nodes. Compute nodes are the real power of M3.
We can see that the cluster is quite busy, but there is a fair amount of compute nodes that are available for us. Now, let’s request one compute node. Please type the following (or paste from the website into your SSH terminal):
srun -A CFAllocation -p standard-s -n 1 -c 10 --mem=16G --walltime=1:00:00 --pty $SHELL
It is very important not to make typos, use spaces and upper/lowercases exactly as shown, and use the proper punctuation. If you make a mistake, nothing wrong will happen, but the scheduler won’t understand your request.
Now, let’s carefully go through the request:
srunmeans that we are asking the SLURM scheduler to grant us access to a compute node;-p standard-smeans it’s an partition targeting to queue standard-s-n 1means we are asking for one compute node;-c 10means that we only need ten CPUs on the node--mem=16Gmeans that we are asking for 16 Gb of RAM.--walltime=1:00:00means that we are asking for 1 hour walltime--pty $SHELLmeans that you are requesting to run in an Interactive node
This is actually a very modest request, and the scheduler should grant it right away. Sometimes, when we are asking for much substantial amount of resources (for example, 20 nodes with 40 cores and 370 Gb of RAM), the scheduler cannot satisfy our request, and will put us into the queue so we will have to wait until the node becomes available.
Once the request is granted, you will see something like that:
srun: job 25719448 queued and waiting for resources
[tuev@c123 ~]$
Please note two important things. First, our prompt changes from login01 to c123 which is the compute node name.
In order to see how many jobs that you are running:
squeue -u your_username
$ squeue -u tuev
             JOBID PARTITION     NAME     USER ST       TIME  NODES NODELIST(REASON)
          25717171   gpgpu-1 sys/dash     tuev  R 2-20:46:59      1 p027
          25713508 standard- sys/dash     tuev  R 2-23:03:18      1 b123
You can see in the above command, I have 2 running jobs (StaTus=”R”) with JobID, Partition, number of nodes and nodes’ name.
To exit the compute node when inside, type:
exit
This will bring you back to the login node. See how your prompt has changed to login01. It is important to notice that you have to be on a login node to request a compute node. One you are on the compute node, and you want to request another compute node, you have to exit first, else you will have error similar to this:
srun: error: Unable to allocate resources: Access/permission denied
For some jobs, you might want to get a GPU, or perhaps two GPUs. For such requests, the srun command needs to specify the number of GPUs (one or two) and the queue of GPUs. For example, let’s request a NVIDIA Tesla V100
srun -A CFAllocation -p gpg-dev --gres=gpu:1 -n 1 -c 10 --mem=25G -t 1-00:00:0 --pty $SHELL
Here we asked the scheduler to allocate 1 node with 25G memory in partition gpgpu-1 (the partition with V100 GPU) and asked for 1 GPU for that node (–gres=gpu:1) with the walltime of 1 hour.
If the scheduler receives a request it cannot satisfy, it will complain and not assign you to a compute node (you will stay on the login node). For example, if you ask for a node with 2.5TB of memory.
It is possible to ask for several compute nodes at a time, for example -n 4 will give you 4 compute nodes. This will give you more nodes to run your parallel jobs.
It is very important to remember that you shouldn’t run computations on the login node, because the login node is shared between everyone who logs into M3, so your computations will interfere with other people’s login processes. However, once you are on a compute node, you can run some computations, because each user gets their own CPUs and RAM so there is no interference. If you are on the login node, let’s get on the compute node:
We have a lot of software installed on M3, but most of it is organized into modules, which need to be loaded. For example, we have many versions of Matlab installed on M3, but if you type
matlab
you will get an error:
-bash: matlab: command not found
In order to use Matlab, you need to load the Matlab module. To see which modules are available on M3, please type
module avail
If you want to see which versions of Matlab are installed, you can type
module avail matlab
------------------------------------------------------------------------------------------- /hpc/modules/applications -------------------------------------------------------------------------------------------
   matlab/r2016b    matlab/r2017a    matlab/r2018b    matlab/r2020b    matlab/r2021a    matlab/r2021b (D)

  Where:
   D:  Default Module

Module defaults are chosen based on Find First Rules due to Name/Version/Version modules found in the module tree.
See https://lmod.readthedocs.io/en/latest/060_locating.html for details.

Use "module spider" to find all possible modules and extensions.
Use "module keyword key1 key2 ..." to search for all possible modules matching any of the "keys".
Let’s say you want to use Matlab 2020. To load the module, you will need to specify its full name:
module load matlab/r2020b
To see the list of modules currently loaded, you can type
module list
If the Matlab module was loaded correctly, you should see it in the module list. In order to start command-line Matlab, you can type
matlab
To exit Matlab, please type exit. To unload a module, you an use module unload matlab/r2020b command. To unload all the modules, please type
module purge
Now, if you do module list, the list should be empty. Now, let’s start R. To see which versions of R are available, type
module avail r
This will give you a list of all modules which have the letter “r” in them (module avail is not very sophisticated). Let’s see what happens when you load the R 4.0.2 module:
module load r/4.0.2
module list
Currently Loaded Modules:
  module list

Currently Loaded Modules:
  1) spack                              10) xz-5.2.4-gcc-9.2.0-s2pq3zl           19) gdbm-1.18.1-gcc-9.2.0-kbpmprj          28) libpthread-stubs-0.4-gcc-9.2.0-npwz2jl  37) libxrender-0.9.10-gcc-9.2.0-sh65nie
  2) texlive/2017                       11) libxml2-2.9.9-gcc-9.2.0-bumngif      20) perl-5.30.0-gcc-9.2.0-y34vqqu          29) xproto-7.0.31-gcc-9.2.0-cvg2oci         38) pixman-0.38.0-gcc-9.2.0-hfbzyac
  3) intel-2020.0                       12) fontconfig-2.12.3-gcc-9.2.0-ppslo43  21) libbsd-0.9.1-gcc-9.2.0-amtukbv         30) libxau-1.0.8-gcc-9.2.0-yvbglct          39) cairo-1.16.0-gcc-9.2.0-77dxsgb
  4) font-util-1.3.2-gcc-9.2.0-36ydpw2  13) ncurses-6.1-gcc-9.2.0-cujtgm6        22) expat-2.2.9-gcc-9.2.0-vf36ozs          31) libxdmcp-1.1.2-gcc-9.2.0-bpnbnhc        40) curl-7.63.0-gcc-9.2.0-n4hxp7l
  5) bzip2-1.0.8-gcc-9.2.0-tcftk7k      14) tar-1.32-gcc-9.2.0-zc2tgas           23) openssl-1.0.2k-fips-gcc-4.8.5-wmsz3ya  32) libxcb-1.13-gcc-9.2.0-koebrst           41) icu4c-64.1-gcc-9.2.0-cdj6hu7
  6) zlib-1.2.11-gcc-9.2.0-62irkl4      15) gettext-0.20.1-gcc-9.2.0-xpdiisw     24) sqlite-3.30.1-gcc-9.2.0-jhc7qek        33) xextproto-7.3.0-gcc-9.2.0-c5lnetz       42) jags-4.3.0-gcc-9.2.0-lkql3wp
  7) libpng-1.6.37-gcc-9.2.0-74mkb2u    16) libffi-3.2.1-gcc-9.2.0-vve5ph3       25) python-3.7.4-gcc-9.2.0-3zfxo7j         34) libx11-1.6.7-gcc-9.2.0-ftn75aa          43) gdal-3.2.0-gcc-9.2.0-z36d74a
  8) freetype-2.10.1-gcc-9.2.0-bpqzywe  17) pcre-8.42-gcc-9.2.0-7ac4une          26) glib-2.56.3-gcc-9.2.0-a6ugasf          35) libxext-1.3.3-gcc-9.2.0-kacb3uk         44) r/4.0.2
  9) libiconv-1.16-gcc-9.2.0-repeu56    18) readline-8.0-gcc-9.2.0-qoxthhf       27) kbproto-1.0.7-gcc-9.2.0-nk4nrm7        36) renderproto-0.11.1-gcc-9.2.0-xcsjaeg
R depends on other software to run, so we have configured the R module in a way that when you load it, it automatically loads other modules that it depends on.
Key Points
srunsends a request for a compute node to the schedulersoftware available on M2 is organized into modules according to version
modules need to be loaded before use