Using ArcPy to partition grid into smaller boxes
Overview
Teaching: 5 min min
Exercises: 0 minQuestions
Using ArcPy to divide the shapefile into smaller boxes
Objectives
1. Using ArcPy - a Python API from ArcGIS to create input GIS data
Introduction
- Due to the restriction from NEAR portal that we cannot download the grid boxes with size bigger than 5 million sqft and the total area of all gridboxes cannot exceed 1.4 billion sqft
- Therefore, we need to divide the area of interest to smaller gridboxes.
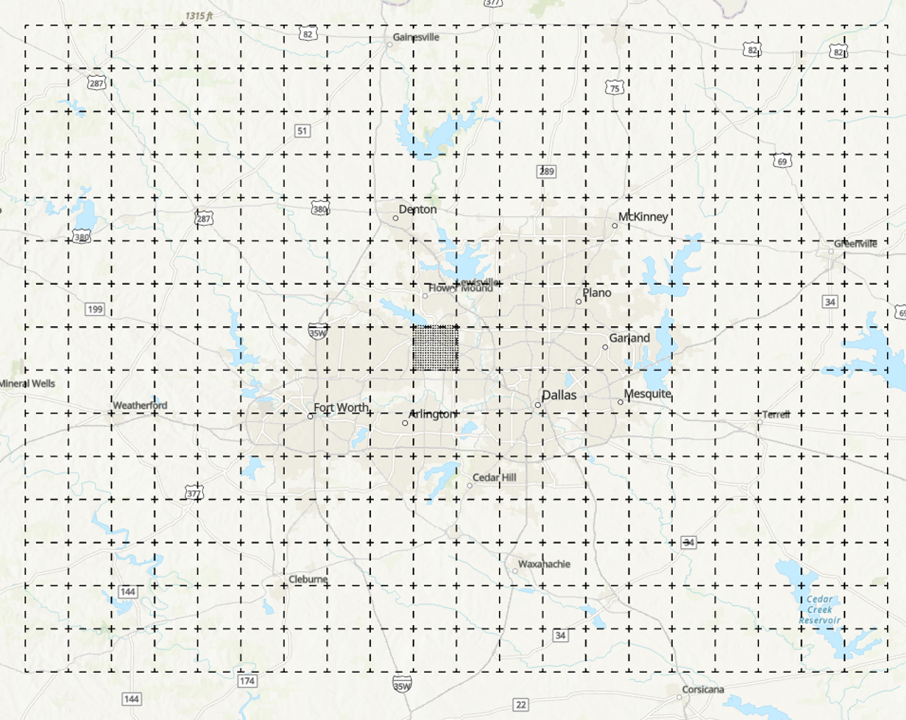
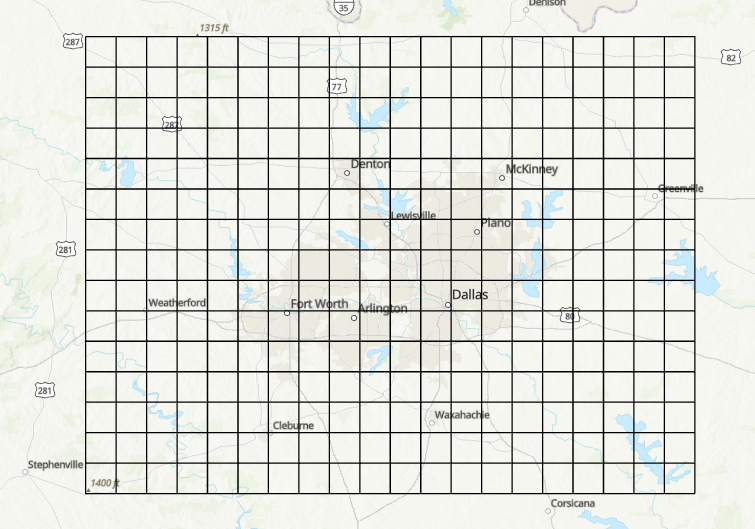
- For example, the area of DFW can be divided to 300 small grids with size of 49 mi2 each, each of the 49 mi2 will again be divided into smaller 0.16 mi2 grid:
Step 1: Create the boundary
- Go to geojson.io
- Assuming that we have the boundary in term of lon/lat, we will need to create the shapefile for that.
- You can create the shapefile in ArcGIS or go to geojson.io and draw the polygon and modify the value:

- You can save the polygon as shapefile and open it in ArcGIS Pro
Step 2: Split the big polygon into smaller 49mi2 grid:
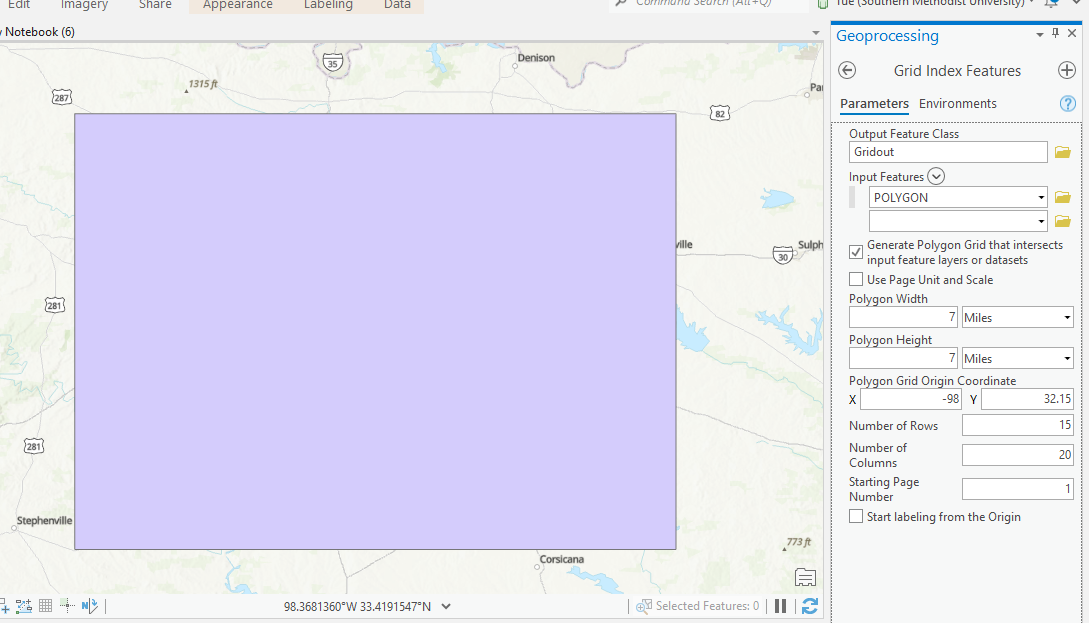
- Open the ArcGIS Pro and load in the polygon
- Click on Analyses\Tools to load the ArcGIS Toolbox
- Search for Grid Index Feature Tool and set the polygon width/height to 7 mi:
- The 300 grids are generated:
-
Save the file into shapefile: DFW77.shp
Step 3: Save 300 49mi2 grids to shapefiles
-
We can use python geopandas to save DFW77 to 300 shapefiles:
import geopandas as gpd
dir = "/home/tuev/Projects/Makris/GIS/"
shape = gpd.read_file(dir+"DFW77.shp")
for i in shape.PageName:
    shapeout = shape[shape.PageName==i]
    shapeout.to_file(dir+i+".shp")
- Total 1500 files are created for 300 shapefiles (each shapefile consists of 5 other files)
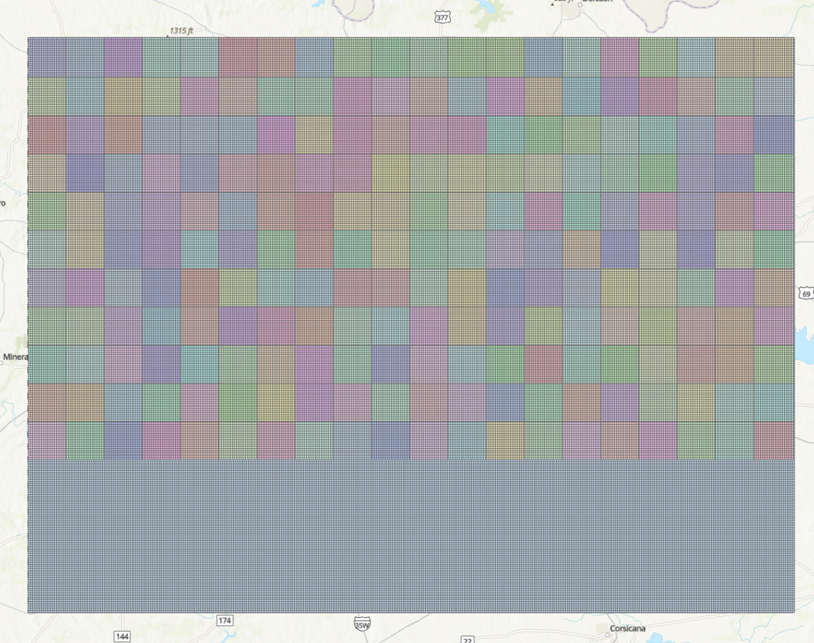
Step 4: Apply the same Grid Index Feature to split 300 grids to 0.16mi2 grid
- We cannot use Grid Index Features for 300 grids, therefore, we will use ArcPy which is ArcGIS library in python
- ArcPy is only available in ArcGIS Pro but not in HPC or Macs yet.
- To use ArcPy, click on Analyses\Python\Python Notebook
- The new notebook appears and we can type in the following code:
# Import modules
import arcpy, os
from arcpy import env
import numpy as np
from zipfile import ZipFile

# Set environment settings to folders:
dir="c:/SMU/PROJECTS/Makris_cellphone/GIS/Miami/49mi2/" # <== This needs to be changed and make sure "/" is used instead of "\"
os.chdir(dir)

os.mkdir("../output0404")
arcpy.env.workspace = dir
output_folder = "../output0404/"

# Create the list of name of unique shapefile:
List1 = os.listdir(dir)
List2 = list()
for i in List1:
    pathname,extension = os.path.splitext(dir+i)
    filename = pathname.split('/')
    List2.append(filename[-1])

FinalList = np.unique(List2)

# Create the output folder output0404 and use ArcPy to generate the files

for i in FinalList:
    print(i)
    #Set local variables
    outFeatureClass = output_folder+i
    inFeatures = i

    polygonWidth = "0.4 miles"
    polygonHeight = "0.4 miles"

    # Execute GridIndexFeatures:
    arcpy.GridIndexFeatures_cartography(outFeatureClass,inFeatures,"","","",
                                        polygonWidth,polygonHeight)
The following grids are created:
Step 5: Zip the 1500 files into 300 zip files as input request for Vista Nears using the same python notebook from Step 4
os.chdir(dir+output_folder)
for i in FinalList:
    with ZipFile(i+'_Miami.zip','w') as zipObj:
        zipObj.write(i+'.shp')
        zipObj.write(i+'.shx')
        zipObj.write(i+'.dbf')
        zipObj.write(i+'.sbn')
        zipObj.write(i+'.sbx')
        zipObj.write(i+'.prj')
It is ready to use these zipped shapefile

Key Points
ArcPy, ArcGIS Pro
Uploading GIS file to request download from NEAR using API
Overview
Teaching: 5 min min
Exercises: 0 minQuestions
How to upload GIS data to NEAR website using API?
Objectives
2. Uploading GIS data automatically to NEAR website for job creation
Introduction
- Sometime, we need to use API to upload GIS data to website to request files when there are so many files and options to download.
- You can download data from Twitter, YouTube, Google etc using API. However you will need to register with the provider and get the API key or Bearer Token.
- This is an actual project where we will be downloading data from near website vista.um.co, with given username/password and API token.
POSTMAN
- Postman is an API platform for building and using API
- In order to use Postman, you need to register an account and login with that:
- If you are new to Postman, you will need to create Workspace to save your API query:

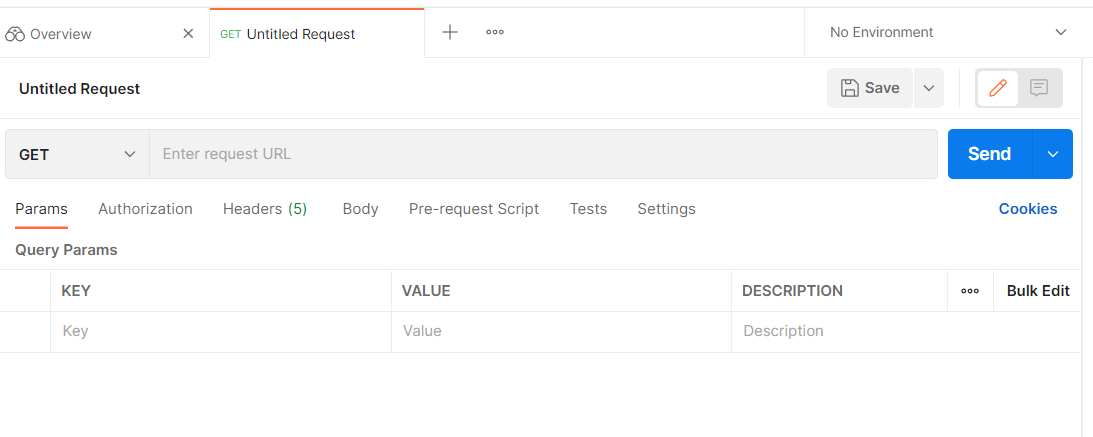
- Once you have My Workspace, click on the + to open up the new workspace:
- The following workspace opened:
-
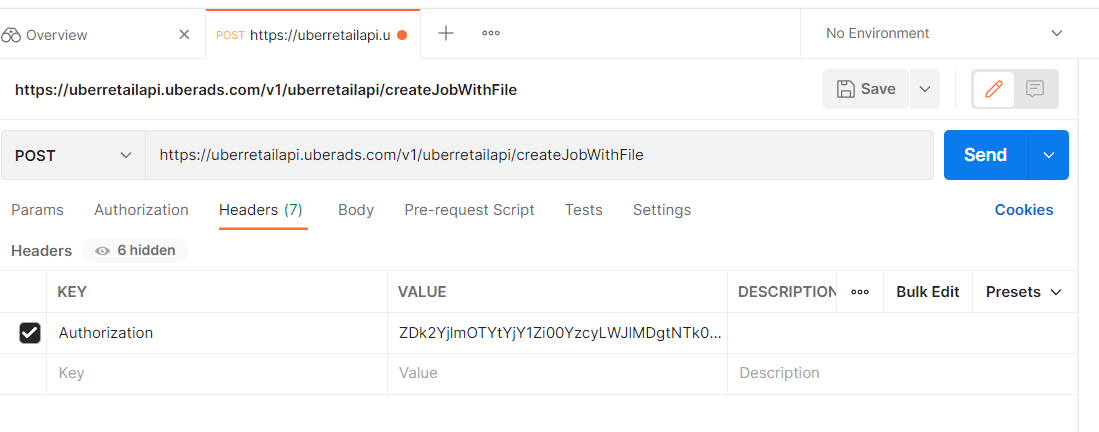
Here I will be downloading near data using shapefile (in zip format, created in other post)
- The approach that I am using is POST instead of GET.
- I also need to paste in the endpoint for the POST location and Authorization key in the Headers tab: The endpoint is downloaded from NEAR DATA API given from their company in PDF, in the section of Create Job with Shapefile:
https://uberretailapi.uberads.com/v1/uberretailapi/createJobWithFile
- In Authorization tab, change Type to Bearer Token and insert Token value given by NEAR to Token box
-
The most important task is the Body section, in the form data, there are 2 files that you need to insert:
- polygonFile with file type is File. The browse button will appear for you to upload the ziped shapefile
- jsonRequest with file type Text. Detail of json file is below:
{"pipReportType":"PIN_REPORT",
"reportName":"F17_2021Q1",
"polygonInputOptions": { "polygonFormat": "ESRI_SHAPEFILE_ZIP",
"polygonNameAliasElement": "PageName" },
"startDateTime": "2021-01-01 00:00:00",
"endDateTime": "2021-03-31 23:59:59"
}
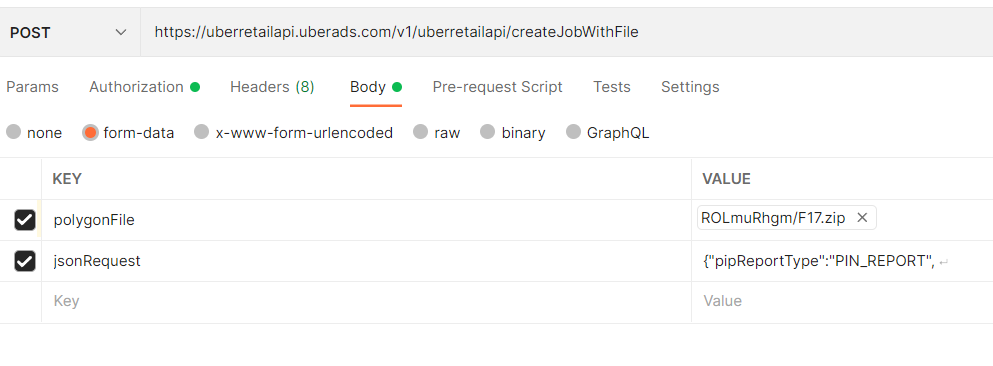
Note that: the reportName can be changed to match with the input shapefile. The polygonNameAliasElement=”PageName” is fixed with the shapefile variable names The start and end DateTime can be altered
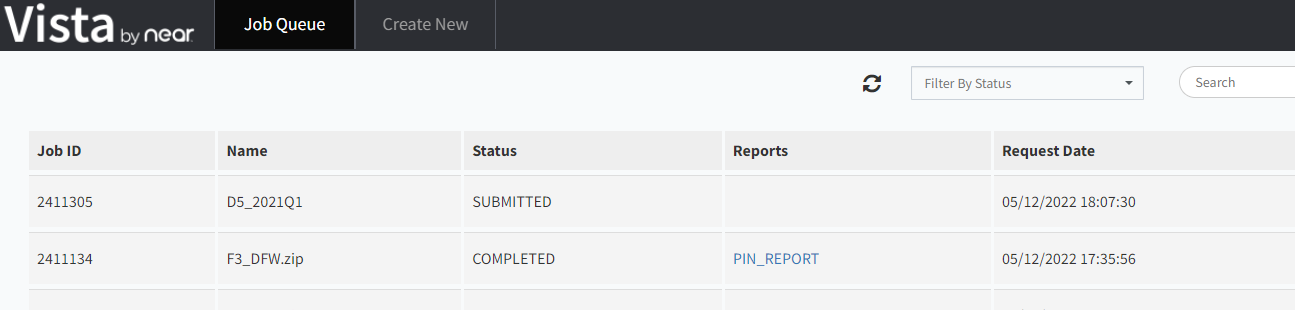
- Once everything is specified, hit Send then the job is submitted
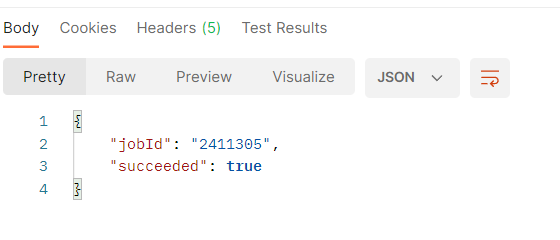
- Go back to Vista page and you will see the job submitted:
Python
- Postman is free and simple to use to download data. However, it still requires manual import the shapefile and name changed for every download.
- Python script is generated to support mass downloading.
- To get the python script from Postman click on the link to open code snippet:
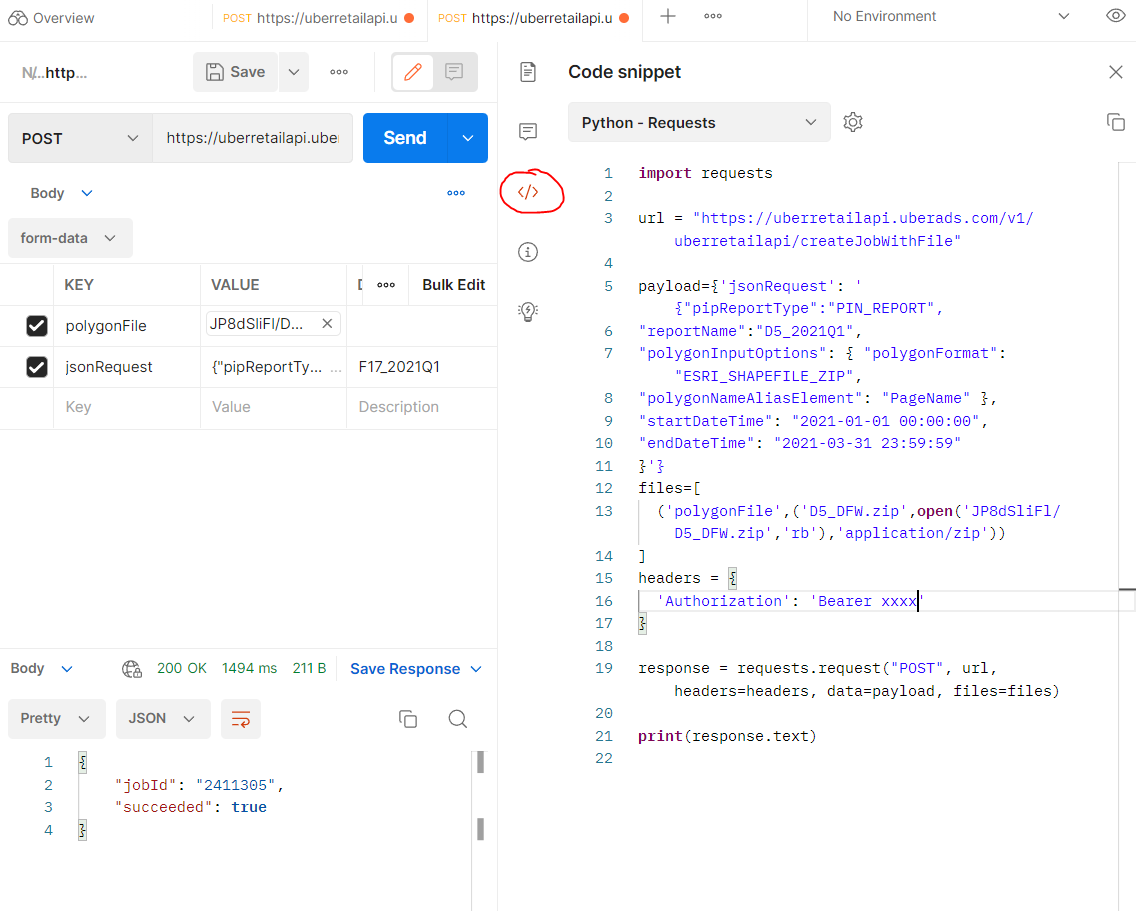
- In order to do the automation, we need to modify the input information, such as report name, zip file name, zip file location
- Here we do everything in ManeFrame M2 supercomputer, the GIS shapefiles are uploaded to home directory.
- Following is the python code to upload shapefile in requested zip format to NEAR website and create the jobs ready for download:
import requests
import os
import json

url = "https://uberretailapi.uberads.com/v1/uberretailapi/createJobWithFile"
headers = {'Authorization': 'Bearer ********'}
j=0
n=1
dir1 = '/work/group/makris_lab/GIS/shapefile_zip/DFW/'
listfile = os.listdir(dir1)
while j<=len(listfile)-1:
    dict1 = dict({"pipReportType":"PIN_REPORT",
                  "reportName":f"{listfile[j]}",
                  "polygonInputOptions": { "polygonFormat": "ESRI_SHAPEFILE_ZIP","polygonNameAliasElement": "PageName" },
                  "startDateTime": "2021-03-01 00:00:00",
                  "endDateTime": "2021-03-31 23:59:59"})

    payload = {'jsonRequest':str(dict1).replace("'",'"')}
    files=[('polygonFile',(f"{listfile[j]}",open(f'{dir1}{listfile[j]}','rb'),'application/zip'))]
    response = requests.request("POST", url, headers=headers, data=payload, files=files)
    if "True" in str(json.loads(response.text).values()):
        print("Succeeded. Submitting job to download ",listfile[j])
        j+=1
        n=1
    else:
        print("Failure. Resubmitting job ", listfile[j], " ", n,  " times")
        n+=1
- Note that due to the near server, sometime not being able to import GIS file, so we need to resubmit if it failed. It is represented as the for while loop.
Key Points
Postman, Python, API, upload
Downloading requested jobs from NEAR using API
Overview
Teaching: 5 min min
Exercises: 0 minQuestions
How to automatically download jobs from NEAR website using API?
Objectives
3. Using API and job array to download jobs from NEAR website using M2
Once you submitted the GIS file and request for job download, you can have several options to download these jobs:
Manually Download the submitted jobs:
Using OnDemand web portal (Remote Desktop) and open Firefox, Go to near.com website and signin using Nicos’s username & password then to retrieve the submitted jobs:
https://vista.um.co/users/sign_in
Check if your job has spawned the report or not to download to M2 directory:

Automatically download the submitted jobs:
When you have few hundreds to few thousands for jobs to be downloaded, it is encourage to use API to download the data.
Fortunately, there is an option to use API from NEAR to download these jobs automatically.
What do you need?
- After submitting jobs, please wait for about 1h to make sure you see your jobs submitted and status changed to “COMPLETED” and “PIN REPORT” appears for every job. That ensures all your jobs are ready to be downloaded
- Record the start and end jobID, for example, I have 3096351/3096650 for starting/ending jobID. That made: 3096650-3096351+1=300 (equivalent to the number of GIS files that I uploaded).
- Next, prepare the python file with API information to automatically download the data. Content of python file can be found here:
import requests
import json
from sys import argv

script, rin  = argv
jid = int(rin)

print(jid)
url = ["https://uberretailapi.uberads.com/v1/uberretailapi/getJobStatus?jobId="+str(jid)][0]
print(url)
payload={'jobId': str(jid)}
files=[]
headers = {
  'Authorization': 'Bearer *********'
}
response = requests.request("GET", url, headers=headers, data=payload, files=files)
link = json.loads(response.text)['pipReportResults']['reportUrl']
output =[json.loads(response.text)['reportName'][:-4]+'.tsv.gz'][0]


open(output, "wb").write(requests.get(link).content)
- Finally, we create the bash script jobs.sh to automate the download in batch. Here is the sample content of our bash script using SLURM scheduler: Note, the only change you need to modify here is the rin, which is the starting jobID. The number of array is just the total number of GIS files submitted and that only need to be changed for different cities.
#!/bin/bash
#SBATCH -J download       # job name to display in squeue
#SBATCH --array=1-301
#SBATCH -p dtn      # requested partition
#SBATCH -c 1 --mem=5G
#SBATCH -t 1000              # maximum runtime in minutes
#SBATCH --exclusive
#SBATCH --mail-user tuev@smu.edu
#SBATCH --mail-type=end

rin=3096351
argi=$((rin+$SLURM_ARRAY_TASK_ID))
module load python/3
python download_near_api.py $argi
- Submit the bash script to start downloading data in parallel:
sbatch jobs.sh
- If you want to download only 1 file with known jobID (for example: 3096580), you can just simply run the python command:
python download_near_api.py 3096580
Key Points
Python, API, download
Tunneling Jupyter Lab in SuperPOD
Overview
Teaching: 20 min
Exercises: 0 minQuestions
How to use Jupter Lab in SuperPOD?
Objectives
Learn port forwarding technique to enable Jupter Lab
4. Jupter Lab on SuperPOD
-
There is no display config and Open OnDemand setup in SuperPOD, so it is not quite straighforward to use Jupter Lab
-
However, it is still possible to use Port-Forwarding in SuperPOD in order to run Jupyter Lab.
The following procedure are for Window and MacOS, Linux
Using Visual Studio Code terminal for any systems:
When not logged into M2, ssh with “-D” for Dynamic Forwarding with port 8080, “-C” for compression, to M2 login node:
$ ssh -C -D 8080 username@m2.smu.edu
Once in login node, request a compute node, load the library and activate conda env as usual, then run Jupyter lab instance:
$ srun -p v100x8 -N1 -c1 --mem=16gb --pty $SHELL
$ module load python/3
$ conda activate myenv
$ jupyter lab --ip=0.0.0.0 --no-browser
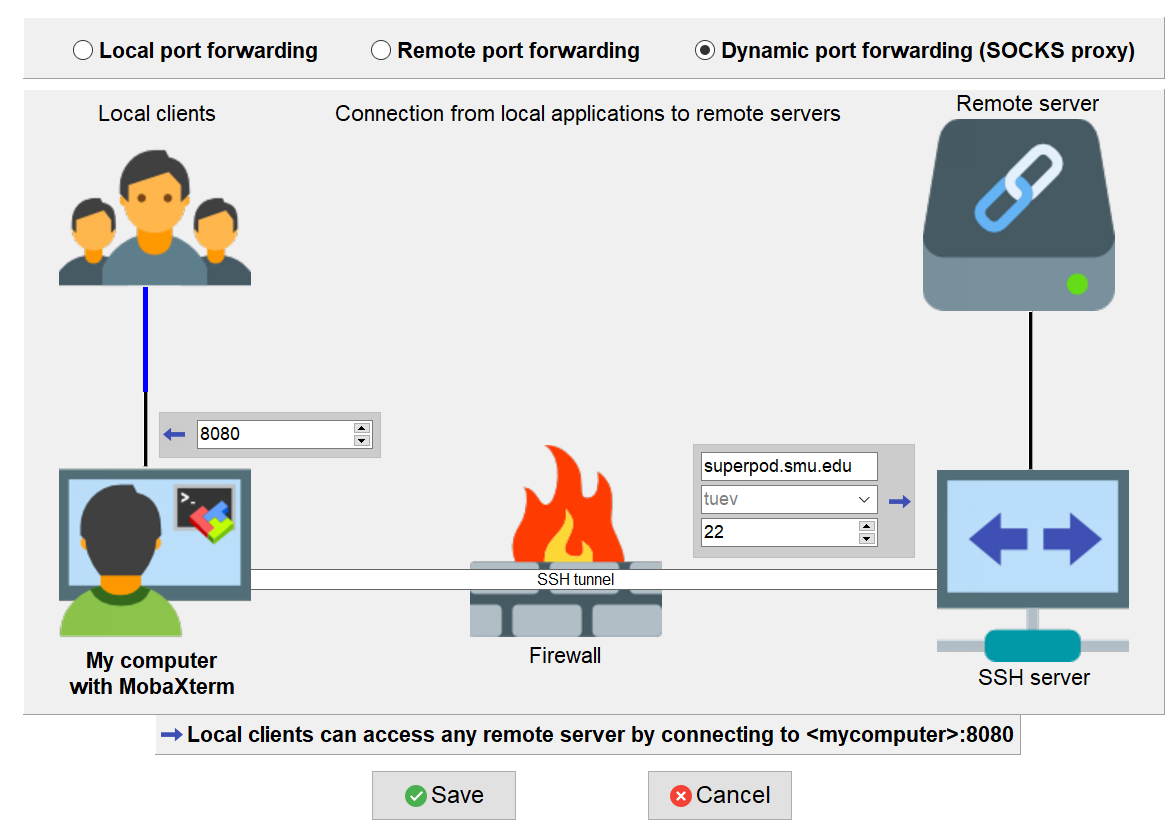
Using Window OS’s MobaXTerm
For Window, I use MobaXTerm (https://mobaxterm.mobatek.net/) and Firefox to configure port-forwarding
Setup in MobaXTerm
Open MobaXTerm and Select Tunneling tab:
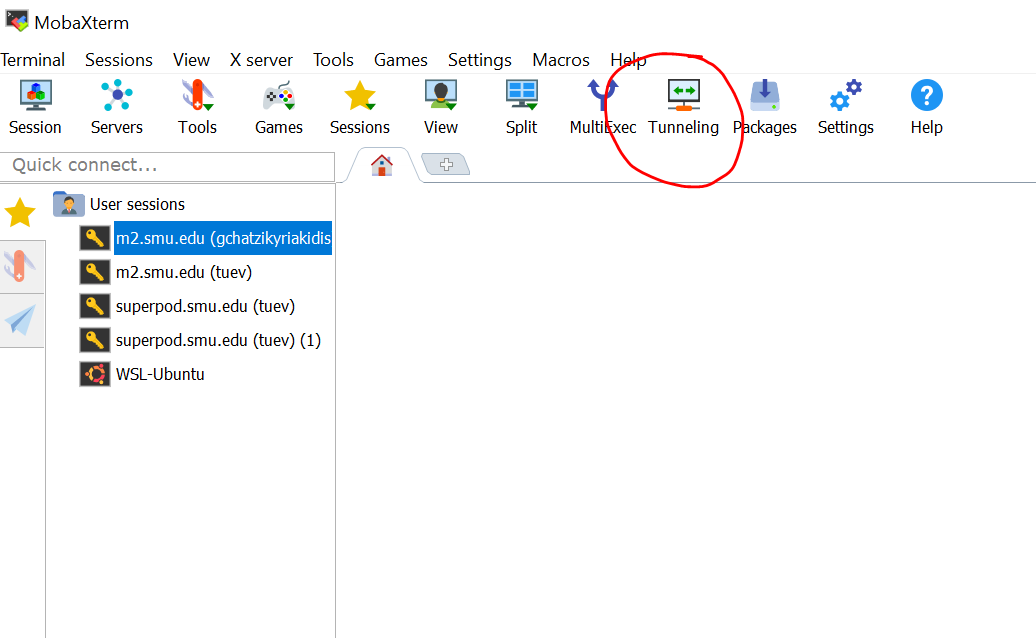
- Select New SSH tunnel, then select Dynamic port forwarding (SOCKS proxy)
- Filling the information as follows:
**
**: 8080 ** **: superpod.smu.edu ** **: $USERNAME ** **: 22 - Click Save
The Graphical port forwarding tool appears, Click on play button
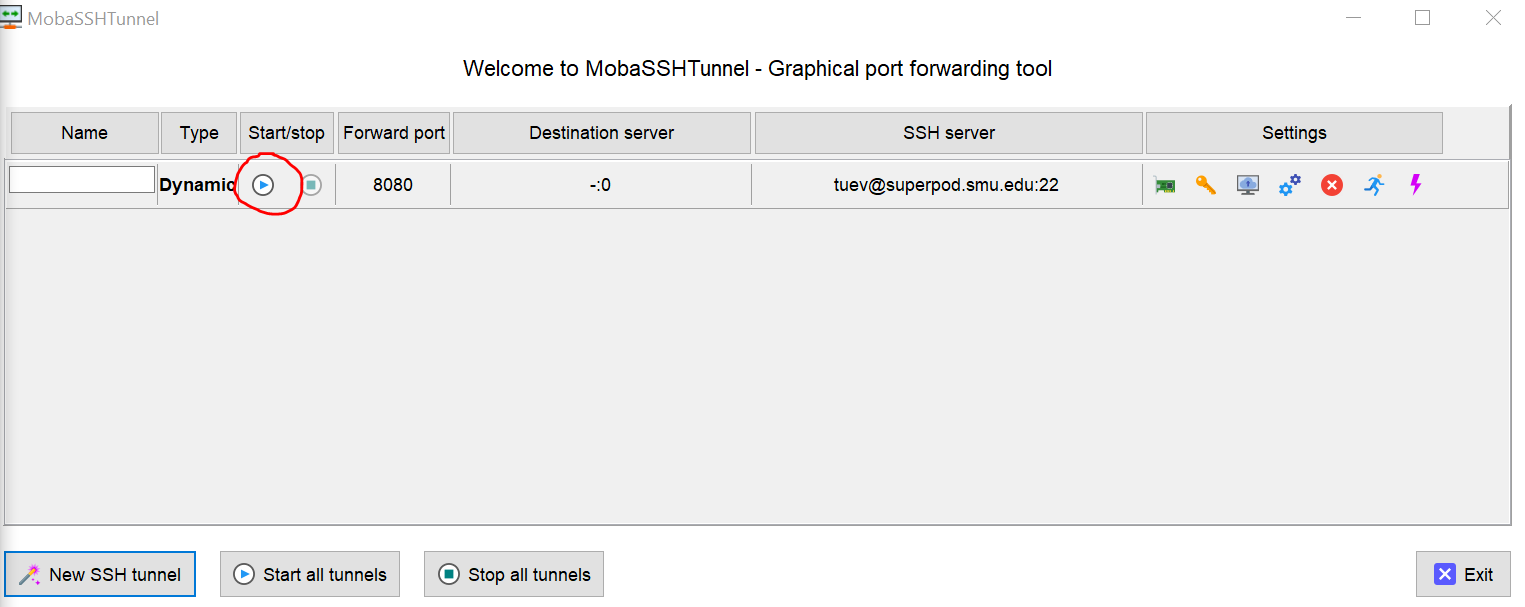
The Duo screen appears, enter 1 to authenticate the Duo Once you pass the Duo screen, the port forwarding tool enabled:
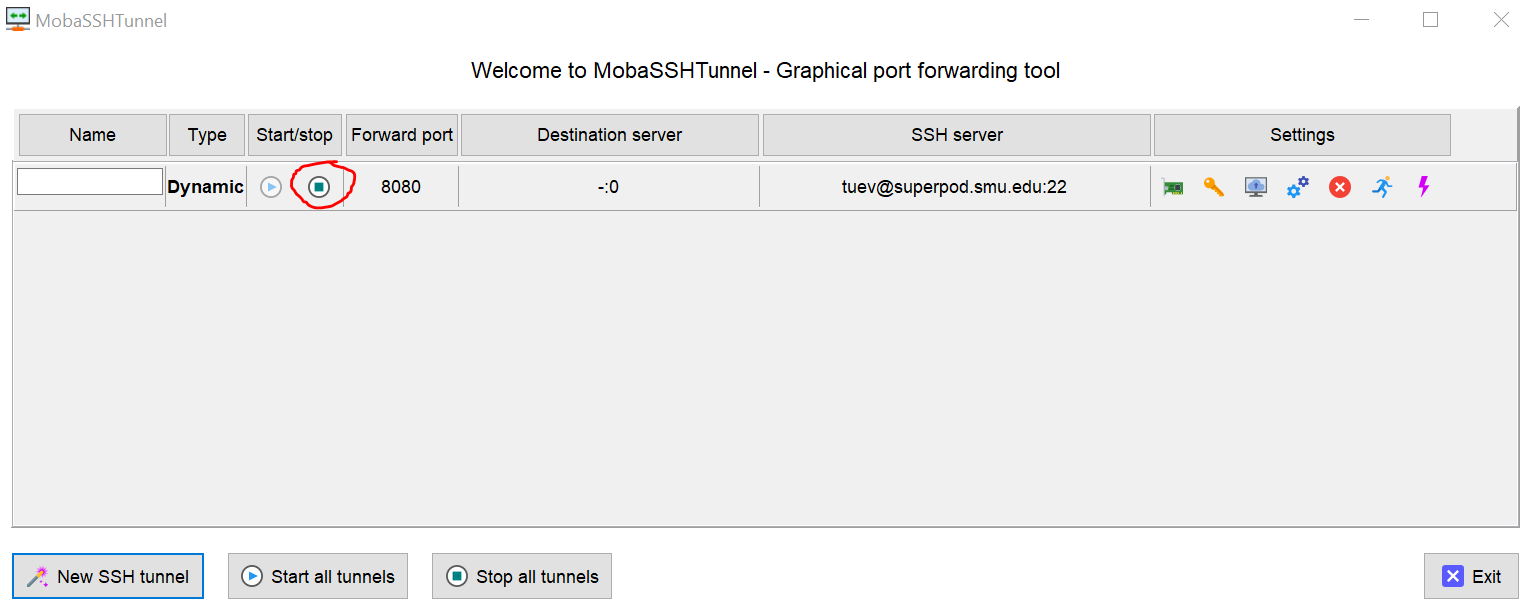
Leave the port-forwarding screen opened and we switch to Firefox
Setup Firefox to enable proxy viewing (similar for MacOS as well)
Open Firefox, my version is 104.0.2. Use combination Alt+T+S to open up the settings tab. Scroll to bottom and select Settings from Network Settings:

- Select Manual Proxy Configuration
- In the SOCKS Host, enter localhost, Port 8080
- Check SOCKS v5.
- Check Proxy DNS when using SOCKS v5.
- Check Enable DNS over HTTPS.
- Make sure everything else is unchecked, then click OK.
- Your screenshot should look like below:

Test Proxy
Go back to MobaXTerm and login into SuperPOD using regular SSH Request a compute node with container
$ srun -N1 -G1 -c10 --mem=64G --time=12:00:00 --pty $SHELL
Load cuda, cudnn and activate any of your conda environment, for example Tensorflow_2.9
$ module load spack conda
$ module load cuda-11.4.4-gcc-10.3.0-ctldo35 cudnn-8.2.4.15-11.4-gcc-10.3.0-eluwegp
$ source activate ~/tensorflow_2.9
Make sure to install jupyter
$ pip install jupyter
Next insert the following command:
$ jupyter notebook --ip=0.0.0.0 --no-browser
# or
$ jupyter lab --ip=0.0.0.0 --no-browser
The following screen appears

Copy the highlighted URLs to Firefox, you will see Jupyter Notebook port forward to this:

Select TensorflowGPU29 kernel notebook and Check GPU device:

Key Points
Jupter Lab, Port-Forwarding
Using NGC Container in SuperPOD
Overview
Teaching: 20 min
Exercises: 0 minQuestions
How to use NGC Container in SuperPOD?
Objectives
Learn how to master NGC Container useage in SuperPOD
5. Using NVIDIA NGC Container in SuperPOD
What is Container?
- Container demonstrates its efficiency in application deployment in HPC.
- Containers can encapsulate complex programs with their dependencies in isolated environments making applications more portable.
- A container is a portable unit of software that combines the application and all its dependencies into a single package that is agnostic to the underlying host OS.
- Thereby, it removes the need to build complex environments and simplifies the process of application development to deployment.
Docker Container
- Docker is the most popular container system at this time
- It allows applications to be deployed inside a container on Linux systems.
NVIDIA NGC Container
- NGC Stands for NVIDIA GPU Clouds
- NGC providing a complete catalog of GPU-accelerated containers that can be deployed and maintained for artificial intelligence applications.
- It enables users to run their projects on a reliable and efficient platform that respects confidentiality, reversibility and transparency.
- NVIDIA NGC containers and their comprehensive catalog are an amazing suite of prebuilt software stacks (using the Docker backend) that simplifies the use of complex deep learning and HPC libraries that must leverage some sort of GPU-accelerated computing infrastructure.
- Complete catalogs of NGC can be found here, where you can find tons of containers for Tensorflow, Pytorch, NEMO, Merlin, TAO, etc…
ENROOT
It is very convenient to download docker and NGC container to SuperPOD. Here I would like to introduce a very effective tool name enroot
- A simple, yet powerful tool to turn traditional container/OS images into unprivileged sandboxes.
- This approach is generally preferred in high-performance environments or virtualized environments where portability and reproducibility is important, but extra isolation is not warranted.
Importing docker container to SuperPOD from docker hub
- The following command import docker container ubuntu from https://hub.docker.com/_/ubuntu
- It then create the squash file named ubuntu.sqsh at the same location
- Finally, it start the ubuntu container
$ enroot import docker://ubuntu
$ enroot create ubuntu.sqsh
$ enroot start ubuntu

#Type ls to see the content of container:
# ls

bin   dev  home  lib32  libx32  mnt  proc  run   srv  tmp    usr
boot  etc  lib   lib64  media   opt  root  sbin  sys  users  var
- Type exit to quit container environment
Exercise
Go to dockerhub, search for any container, for example lolcow then use enroot to contruct that container environment
enroot import docker://godlovedc/lolcow
enroot create godlovedc+lolcow.sqsh
enroot start godlovedc+lolcow

Download Tensorflow container
-
Now, let’s start downloading Tensorflow container from NGC. By browsing the NGC Catalog and search for Tensorflow, I got the link: https://catalog.ngc.nvidia.com/orgs/nvidia/containers/tensorflow
-
Copy the image path from website:

The following information was copied to the memory when selecting the 22.12-tf2 version:
nvcr.io/nvidia/tensorflow:22.12-tf2-py3
- Im gonna download the version 22.12 tf2 to my work location using enroot, pay attention to the syntax difference when pasting:
$ cd $WORK/sqsh
$ enroot import docker://nvcr.io#nvidia/tensorflow:22.12-tf2-py3
The sqsh file nvidia+tensorflow+22.12-tf2-py3.sqsh is created.
- Next create the sqsh file:
$ enroot create nvidia+tensorflow+22.12-tf2-py3.sqsh
Working with NGC container in Interactive mode:
Once the container is import and created into your folder in SuperPOD, you can simply activate it from login node when requesting a compute node:
$ srun -N1 -G1 -c10 --mem=64G --time=12:00:00 --container-image $WORK/sqsh/nvidia+tensorflow+22.12-tf2-py3.sqsh --container-mounts=$WORK --pty $SHELL
-
Once loaded, you are placed into /workspace which is the container local storage. You can navigate to your $HOME or $WORK folder freely.
-
Note that in this example, I mounted the container to $WORK location only but you can always mount it to your own working directory
Check the GPU enable:
$ python
>>> import tensorflow as tf
>>> tf.config.list_physical_devices('GPU')
[PhysicalDevice(name='/physical_device:GPU:0', device_type='GPU')]
Exit the container using exit command.
Working with NGC container in Batch mode
- Similar to M2, container can be loaded and executed in batch mode.
- Following is the sample content of a batch file named spod_testing.sh with a python file testing.py
#!/bin/bash
#SBATCH -J Testing       # job name to display in squeue
#SBATCH -o output-%j.txt    # standard output file
#SBATCH -e error-%j.txt     # standard error file
#SBATCH -p batch -c 12 --mem=20G --gres=gpu:1     # requested partition
#SBATCH -t 1440              # maximum runtime in minutes
#SBATCH -D /link-to-your-folder/

srun --container-image=/work/users/tuev/sqsh/nvidia+tensorflow+22.12-tf2-py3.sqsh --container-mounts=$WORK python testing.py
- Content of testing.py
import tensorflow as tf
print(tf.config.list_physical_devices('GPU'))
Working with NGC container in Jupyter Lab
- It is a little bit different if you want to use NGC container in Jupyter Lab
- After requesting a node running with your container, you need to run the jupyter command with additional flag –allow-root:
root@bcm-dgxa100-0001:/workspace# jupyter lab --allow-root --no-browser --ip=0.0.0.0
The following URL appear with its token
Or copy and paste this URL:
        http://hostname:8888/?token=fd6495a28350afe11f0d0489755bc3cfd18f8893718555d2
Note that you must replace hostname to the corresponding node that you are in, this case is bcm-dgxa100-0001.
Therefore, you should change the above address to and paste to Firefox:
http://bcm-dgxa100-0001:8888/?token=fd6495a28350afe11f0d0489755bc3cfd18f8893718555d2
Note: you should select the default Python 3 (ipykernel) instead of any other kernels for running the container.

Tip: Once forwarding to Jupter Lab, you are placed in container’s root. It’s recommended to create a symlink for your folder in order to navigate away:
$ ln -s $WORK work
Key Points
NGC Container
Fine-tuning GPT3 using OpenAI API
Overview
Teaching: 15 min min
Exercises: 0 minQuestions
How to train GPT3 using OpenAI API Platform
Objectives
6. Using OpenAI API to train and verify the AI generative model
Introduction
- GPT3 is very popular nowaday and OpenAI has option for user to finetune it in their cloud. This tutorial helps you step by step on how to train GPT3 using OpenAI API.
- You can download Q&A data to csv, tsv format and later convert it to jsonl format
- This is a PhD project where we will be fine-tuning GPT3 using OpenAI API from Linux terminal, with given API token.
Request OpenAI API Key
- First go to https://openai.com/api/
- Sign up for an account
- With newly created account, you will be having $18 credit to use for 3 months.
- The pricing to use GPT3 for fine-tuning and application can be found here
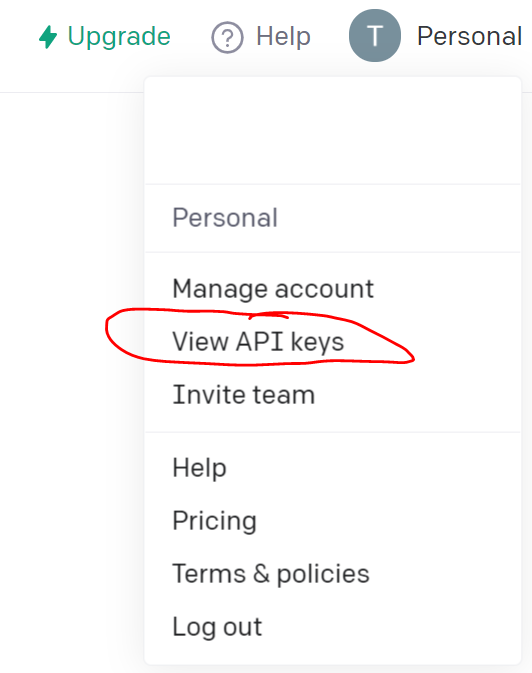
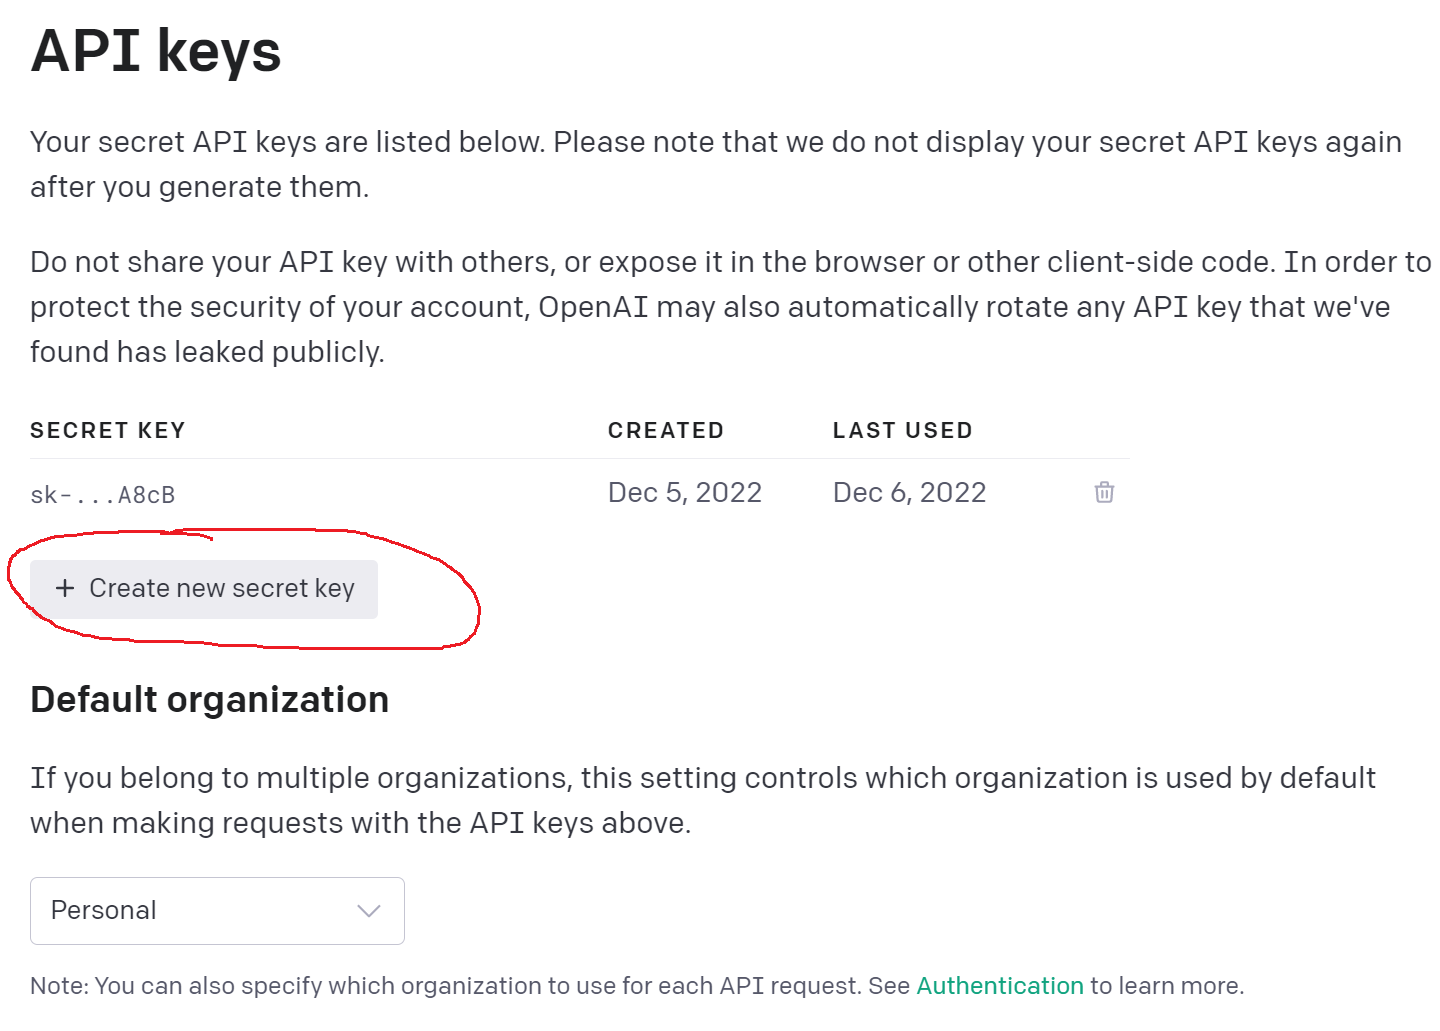
- On top right, click on your user account and Request the API key and save it somewhere. Note, you can request as many keys as wanted but using the latest key only
Download the data as CSV format
- Prepare the data, for example from here as csv format with 2 columns, one for question and one for answer.
- Format of the csv can be as following with prompt and completion for Q&A.
- Sommetime, prompt can be the header of the paragraph and completion can be the content of the paragraph used to support the prompt.

Using OpenAI API to train GPT3 model.
- Here we will be using Linux terminal to work with OpenAI API.
- You can use either Linux terminal from your M2 account via ssh, Open OnDemand platform or either locally via Anacona Navigator
- I will be showing you both ways:
Using Anaconda Navigator:
- Once you download and install Anaconda Navigator to your Windows, Macs, Linux, open it and select CMD.exe Prompt:
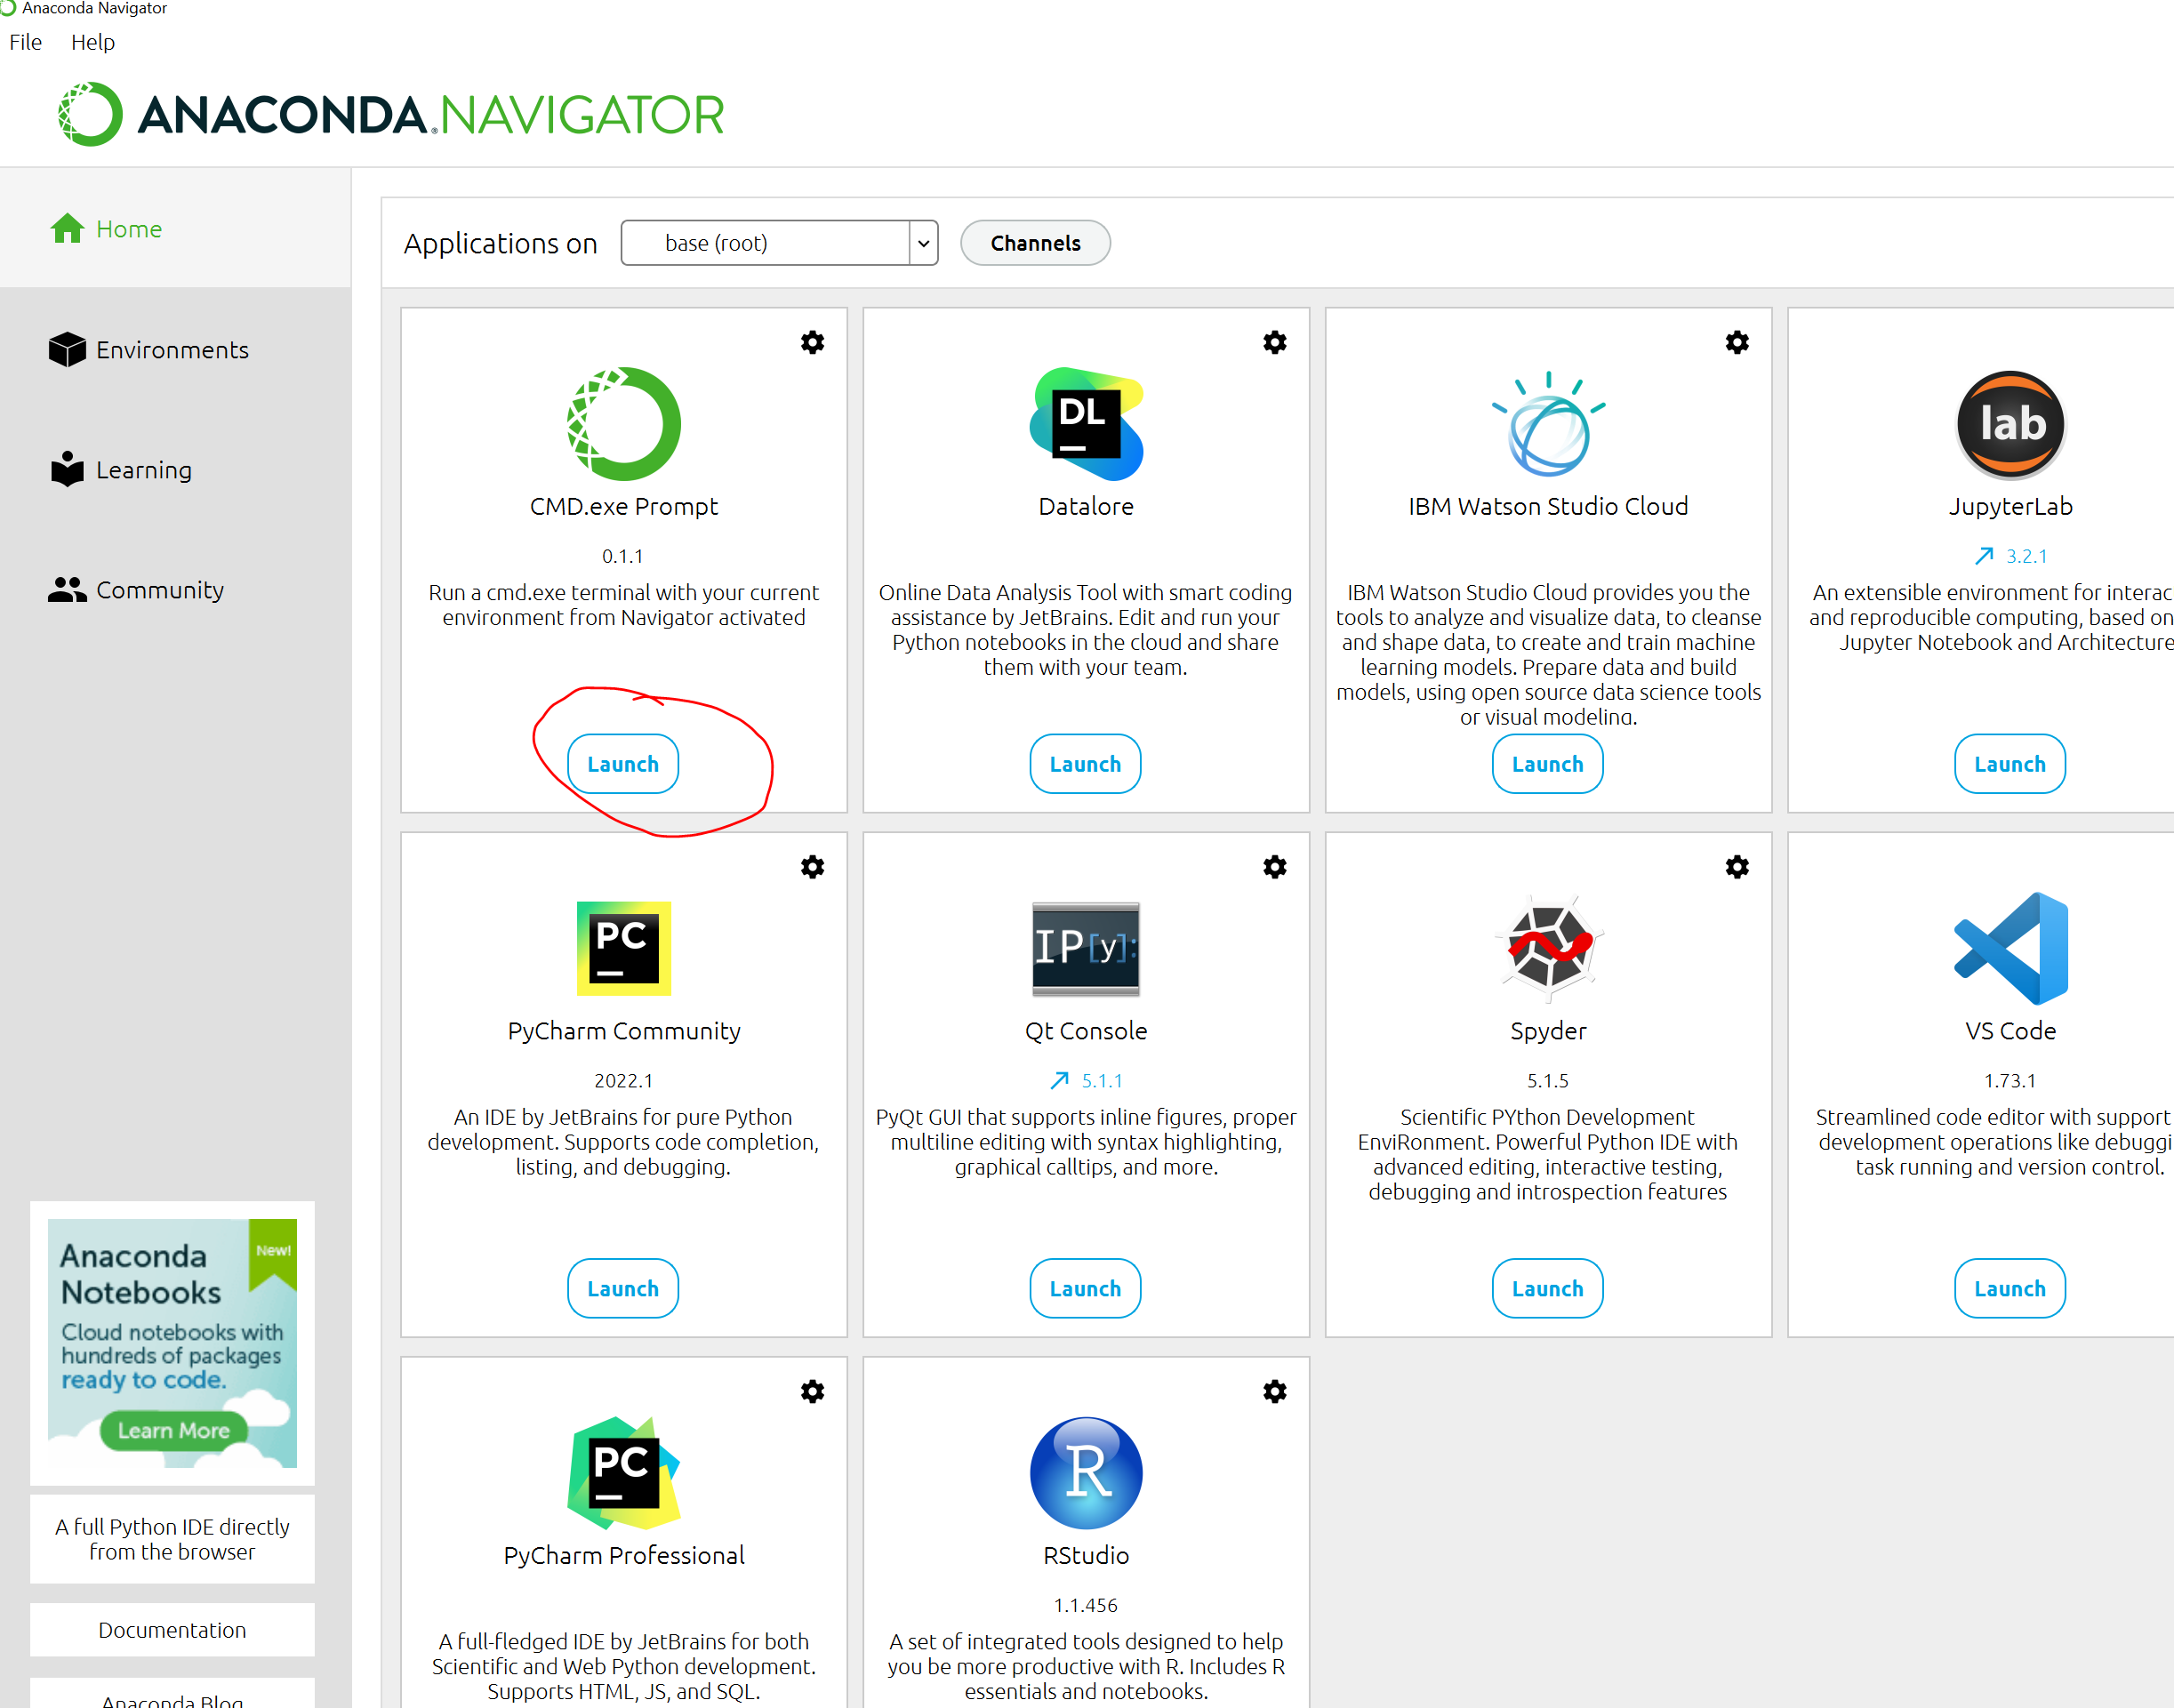
- The command line interface (CLI) appears:
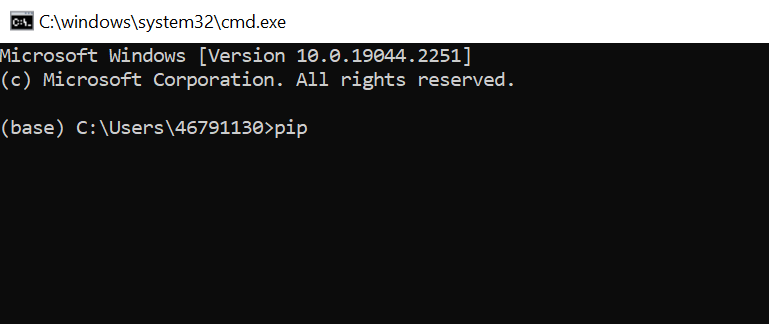
- Now install openai using command:
pip install openai
- Next, go to where you save the csv data, prepared from the previous step. For example, you save the file “Westminster_Catechism.csv” to “c:\SMU\PROJECTS\DrewDickens", then in the command prompt, type:
cd c:/SMU/PROJECTS/DrewDickens/
- Use OpenAI API to convert csv file to jsonl format, select “Y” for all question
$ openai tools fine_tunes.prepare_data -f Westminster_Catechism.csv
-
You will see the new file with jsonl extension created: “Westminster_Catechism_prepared.jsonl”
-
Set your API key with abc is the API key retrieved above
set OPENAI_API_KEY=abc
- Fine-tuning GPT3 using ada model:
openai api fine_tunes.create -t Westminster_Catechism_prepared.jsonl -m ada
if your model is completed, it should show this:
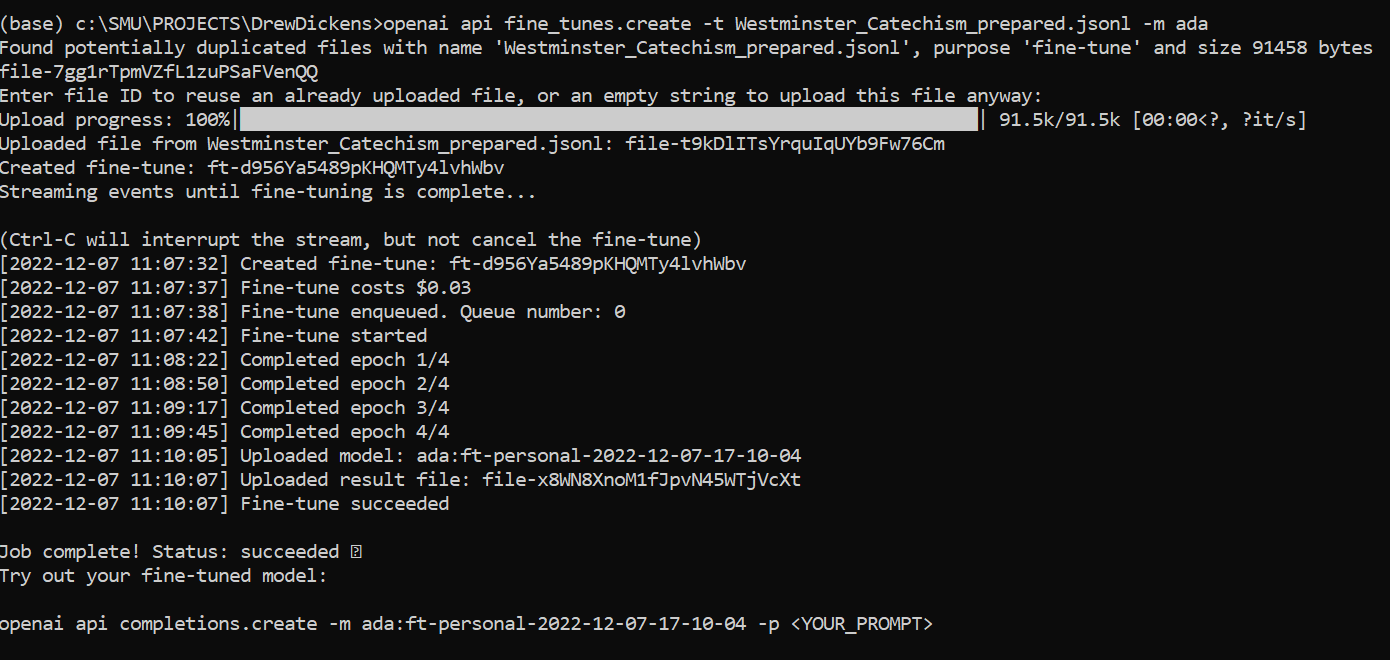
- Use the trained model with any question:
openai api completions.create -m ada:ft-personal-2022-12-07-17-10-04 -p "What are the punishments of sin in the world to come?"

Using M2
It is very much the same as using ManeFrame 2 or any other HPC to fine-tune GPT3 with openai api.
- After login to M2, Request a compute node:
$ srun -N1 -p standard-mem-s -c2 --mem=5G --pty $SHELL
- Load python
module load python/3
- Create conda environment with python 3.8
$ conda create -n openai python==3.8
- then activate the conda environment to install openai
$ source activate openai
$ pip install openai
- Create custom kernel
$ conda install jupyter -y
$ python -m ipykernel install --user --name openai --display-name "OpenAI"
- set the API Key
export OPENAI_API_KEY=abc
- Next, go to where you save the csv data, prepared from the previous step. For example, you save the file “Westminster_Catechism.csv” to “/work/users/tuev”, then in the command prompt, type:
cd /work/users/tuev
- Use OpenAI API to convert csv file to jsonl format, select “Y” for all question
$ openai tools fine_tunes.prepare_data -f Westminster_Catechism.csv
-
You will see the new file with jsonl extension created: “Westminster_Catechism_prepared.jsonl”
-
Fine-tuning GPT3 using ada model:
openai api fine_tunes.create -t Westminster_Catechism_prepared.jsonl -m ada
- Use the trained model with any question:
openai api completions.create -m ada:ft-personal-2022-12-07-17-10-04 -p "What are the punishments of sin in the world to come?"
and the output is:
Sin is the loss of righteousness before the throne of God in Christ
More information on fine-tuning OpenAI can be found here
Key Points
OpenAI, API, Python
Creating an AI chatbot using HuggingFace pretrained
Overview
Teaching: 15 min min
Exercises: 0 minQuestions
How to create an AI chatbot
Objectives
7. Creating an AI chatbot using HuggingFace pretrained in your ManeFrame or SuperPOD
Introduction
- It can not be easier than ever to create your own AI chatbot.
- Lots of pretrained model are uploaded from big companies like Microsoft, Facebook, Google to individual users
- Many of the pretrained NLP models can be found from HuggingFace:
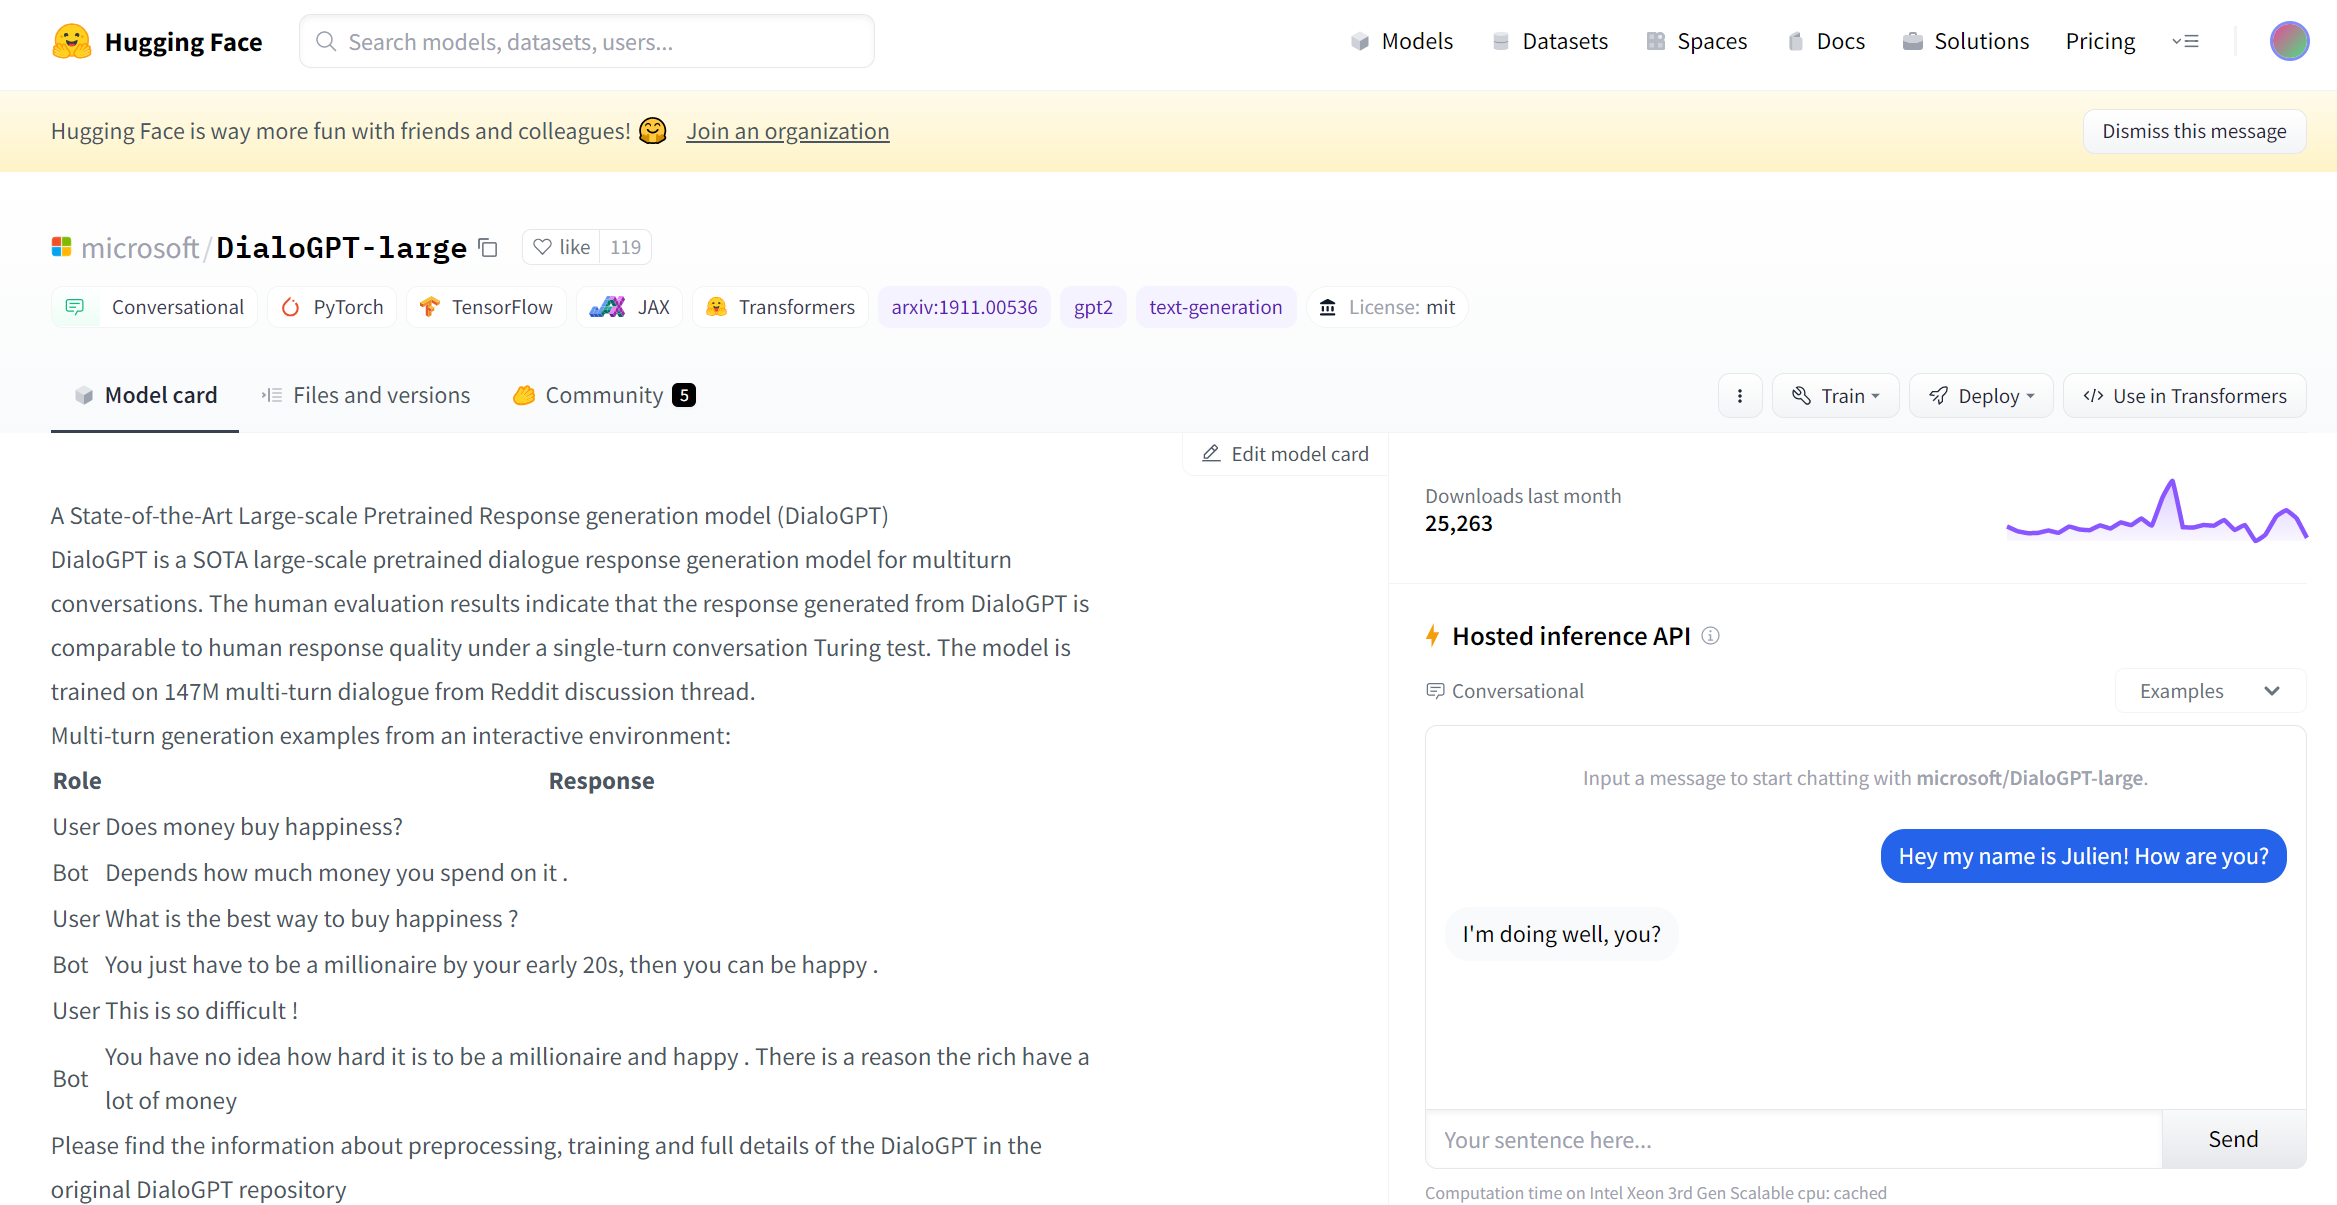
Download pretrained model from HuggingFace and create your own chatbot
- From the above example, you can see the pretrained model from microsoft/DialoGPT large
- You can also interact with the model via “Hosted inference API” box on the right
- However, the Cloud computing from HuggingFace sometime can be very slow, and you want to utilize the computing power resources from M2/SP
- Assuming that you already have a working conda environment in M2/SP. Let’s try the following code:
import transformers
nlp = transformers.pipeline("conversational",
                            model="microsoft/DialoGPT-large")

cont=1
while cont==1:
    input_text = input("Ask me a question!")
    print(nlp(transformers.Conversation(input_text), pad_token_id=57007))
    if input("Continue?").lower()=="no":
        print("Goodbye")
        break
Running the model
- Save the model as chatbot_DialoGPT-large.py and we can run it:
python chatbot_DialoGPT-large.py
Following is the inference from running the chatbot model:
Downloading config.json: 100%|███████████████████████████████████████████████████████████████████| 1.47k/1.47k [00:00<00:00, 1.40MB/s]
Downloading pytorch_model.bin: 100%|███████████████████████████████████████████████████████████████| 334M/334M [00:06<00:00, 58.0MB/s]
Downloading tokenizer_config.json: 100%|██████████████████████████████████████████████████████████████| 205/205 [00:00<00:00, 171kB/s]
Downloading vocab.json: 100%|██████████████████████████████████████████████████████████████████████| 941k/941k [00:00<00:00, 5.09MB/s]
Downloading merges.txt: 100%|██████████████████████████████████████████████████████████████████████| 337k/337k [00:00<00:00, 2.30MB/s]
Downloading special_tokens_map.json: 100%|██████████████████████████████████████████████████████████| 99.0/99.0 [00:00<00:00, 100kB/s]
Ask me a question!do you believe in God
Conversation id: 7417a2a5-412b-4117-8dd5-7cf2237d5811
user >> do you believe in God
bot >> i don't believe in god, but i do believe in the existence of a god.

Continue?yes
Ask me a question!what is the meaning of life
Conversation id: 421afd4c-8bcc-400a-8e86-5a97a61685a6
user >> what is the meaning of life
bot >> i don't know. i'm not sure. what is the purpose of life?

Continue?no
You can exit the conversation anytime by replying “no” to the “Continue” question
How many models can I run?
- There are lots of pretrained model that you can use:
microsoft/DialoGPT-small
microsoft/DialoGPT-medium
microsoft/DialoGPT-large
facebook/blenderbot_small-90M
facebook/blenderbot-400M-distill
facebook/blenderbot-1B-distill
or even personal model can be used:
vuminhtue/DialoGPT-large-HarryPotter3
rlatt/DialoGPT-large-King-James-Bible-test
Key Points
HuggingFace, chatbot
Question Answering with BERT using content
Overview
Teaching: 15 min min
Exercises: 0 minQuestions
How to create an AI chatbot with content using BERT
Objectives
8. Question Answering with BERT using content
In this problem we use the given text content and construct Q&A based on that.
8.1 Q&A with Adam and Eve content.
Assuming we have the Adam and Eve’s story as following, saved as Stody1_Adam_Eve.txt
The story of Adam and Eve is a well-known biblical narrative that appears in the Book of Genesis. According to the story, God created Adam, the first man, and placed him in the Garden of Eden, a paradise where all of his needs were provided for. However, God saw that Adam was alone and decided to create a partner for him, so he created Eve, the first woman, from one of Adam's ribs.
Adam and Eve lived in the Garden of Eden and enjoyed a close relationship with God, but they were given one commandment: they were not allowed to eat from the tree of the knowledge of good and evil. However, one day, a serpent came to Eve and convinced her to eat from the forbidden tree, telling her that it would make her wise. Eve ate the fruit and gave some to Adam, who also ate it.
After they ate from the tree, Adam and Eve became aware of their nakedness and were ashamed. They tried to hide from God, but God knew what they had done and cursed them, expelling them from the Garden of Eden and condemning them to a life of toil and hardship. The story of Adam and Eve is often interpreted as an allegory for the fall of humanity and the origin of sin and suffering.
We have list of questions for the model to answer, saved as Questions-Adam.txt
"Who is Adam",
"Where is Garden of Eden?",
"Who invented Apple?",
"Do you believe in God?"
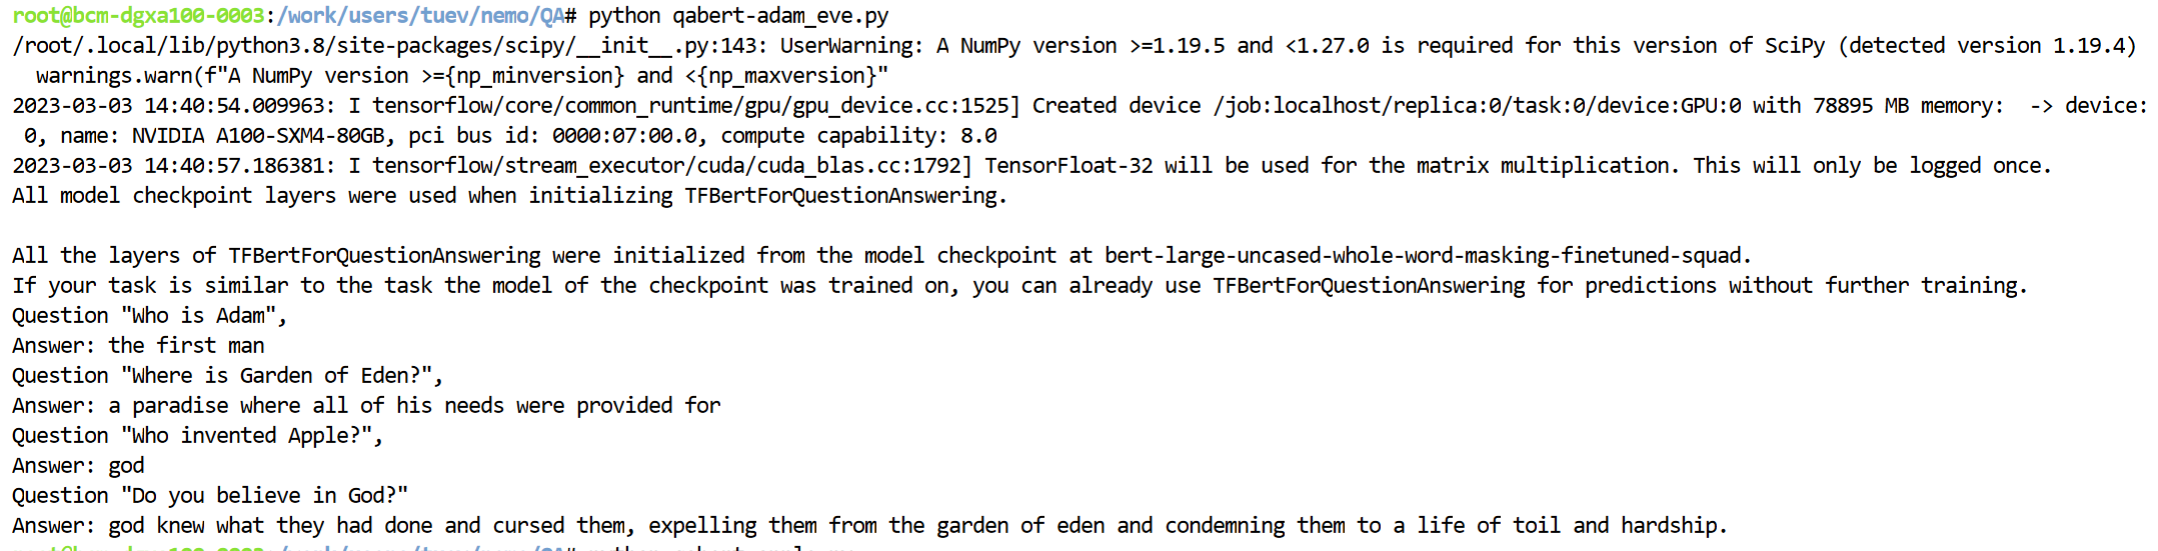
We build the model saves as qabert-Adam-Eve.py
from transformers import AutoTokenizer, TFAutoModelForQuestionAnswering
import tensorflow as tf

tokenizer = AutoTokenizer.from_pretrained("bert-large-uncased-whole-word-masking-finetuned-squad")
qa_model = TFAutoModelForQuestionAnswering.from_pretrained("bert-large-uncased-whole-word-masking-finetuned-squad")

def answer_question(question, text):
  # Function that simplifies answering a question
  for question in questions:
    # Concatenate the question and the textx
    inputs = tokenizer(question, text, add_special_tokens = True, return_tensors = 'tf')
    # Get the input ids (numbers) and convert to tokens (words)
    input_ids = inputs["input_ids"].numpy()[0]
    text_tokens = tokenizer.convert_ids_to_tokens(input_ids)
    # Run the pretrained model to get the logits (raw scores) for the scores
    output = qa_model(inputs)

    # Get the most likely beginning and end
    answer_start = tf.argmax(output.start_logits, axis = 1).numpy()[0]
    answer_end = (tf.argmax(output.end_logits, axis = 1)+1).numpy()[0]
    # Turn the tokens from the ids of the input string, indexed by the start and end tokens back into a string
    answer = tokenizer.convert_tokens_to_string(tokenizer.convert_ids_to_tokens(input_ids[answer_start:answer_end]))

    print("Question {} \nAnswer: {}".format(question, answer))

with open("Story1_Adam_Eve.txt") as f:
    bow1 = f.read()

with open('Questions-Adam.txt') as f1:
    q1 = f1.read()
questions = q1.split("\n")

answer_question(questions, bow1)
The response would be:
We can see that the response is very much following the given content, how about we have another story of Apple Inc and asking the same questions?
8.2 Q&A with Apple content.
Here is our content copied from Wikipedia for Apple Inc:
Apple Computers, Inc. was founded on April 1, 1976, by college dropouts Steve Jobs and Steve Wozniak, who brought to the new company a vision of changing the way people viewed computers.
Jobs and Wozniak wanted to make computers small enough for people to have them in their homes or offices. Simply put, they wanted a computer that was user-friendly.
Jobs and Wozniak started out building the Apple I in Jobs' garage and sold them without a monitor, keyboard, or casing (which they decided to add on in 1977).
The Apple II revolutionized the computer industry with the introduction of the first-ever color graphics. Sales jumped from $7.8 million in 1978 to $117 million in 1980, the year Apple went public.
Wozniak left Apple in 1983 due to a diminishing interest in the day-to-day running of Apple Computers. Jobs then hired PepsiCo's John Sculley to be president. However, this move backfired and after much controversy with Sculley, Jobs left in 1985 and went on to new and bigger things.
He founded his own company NeXT Software and he also bought Pixar from George Lucas, which would later become a huge success in computer animation of such movies as Toy Story, A Bug's Life, Monsters, Inc., and Finding Nemo, but not the bible Adam and Eve
Running similar python file with similar question from Questions-Adam.txt we have following answer:
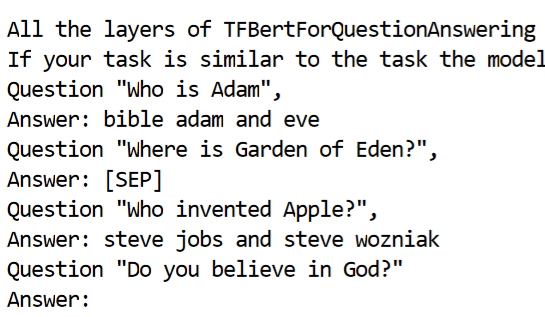
Comparing the same question, “Who invented Apple”, under different context, we have different response from the chatbot model
Key Points
Question Answering, chatbot, BERT
Install ArcPy to M2 JHub
Overview
Teaching: 5 min min
Exercises: 0 minQuestions
How to install Arcpy to ManeFrame2
Objectives
In order to install ArcPy to ManeFrame 2 HPC, one need to install ArcGIS Server. User need to be added to ESRI account (using smudallas domain) in order to be authorized to run arcpy. SMU users, check with Jessie Zarazaga to be added to ESRI SMU server
Following are the steps to install ArcGIS Server
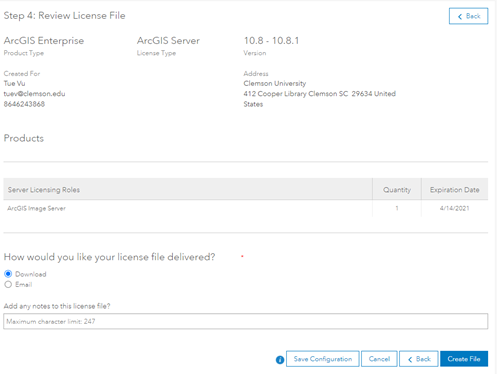
Step 1. Create a license file:
Go to https://my.esri.com/ and login using SMU username/password. Once done, navigate to My Organization (smudallas) and click on Licensing
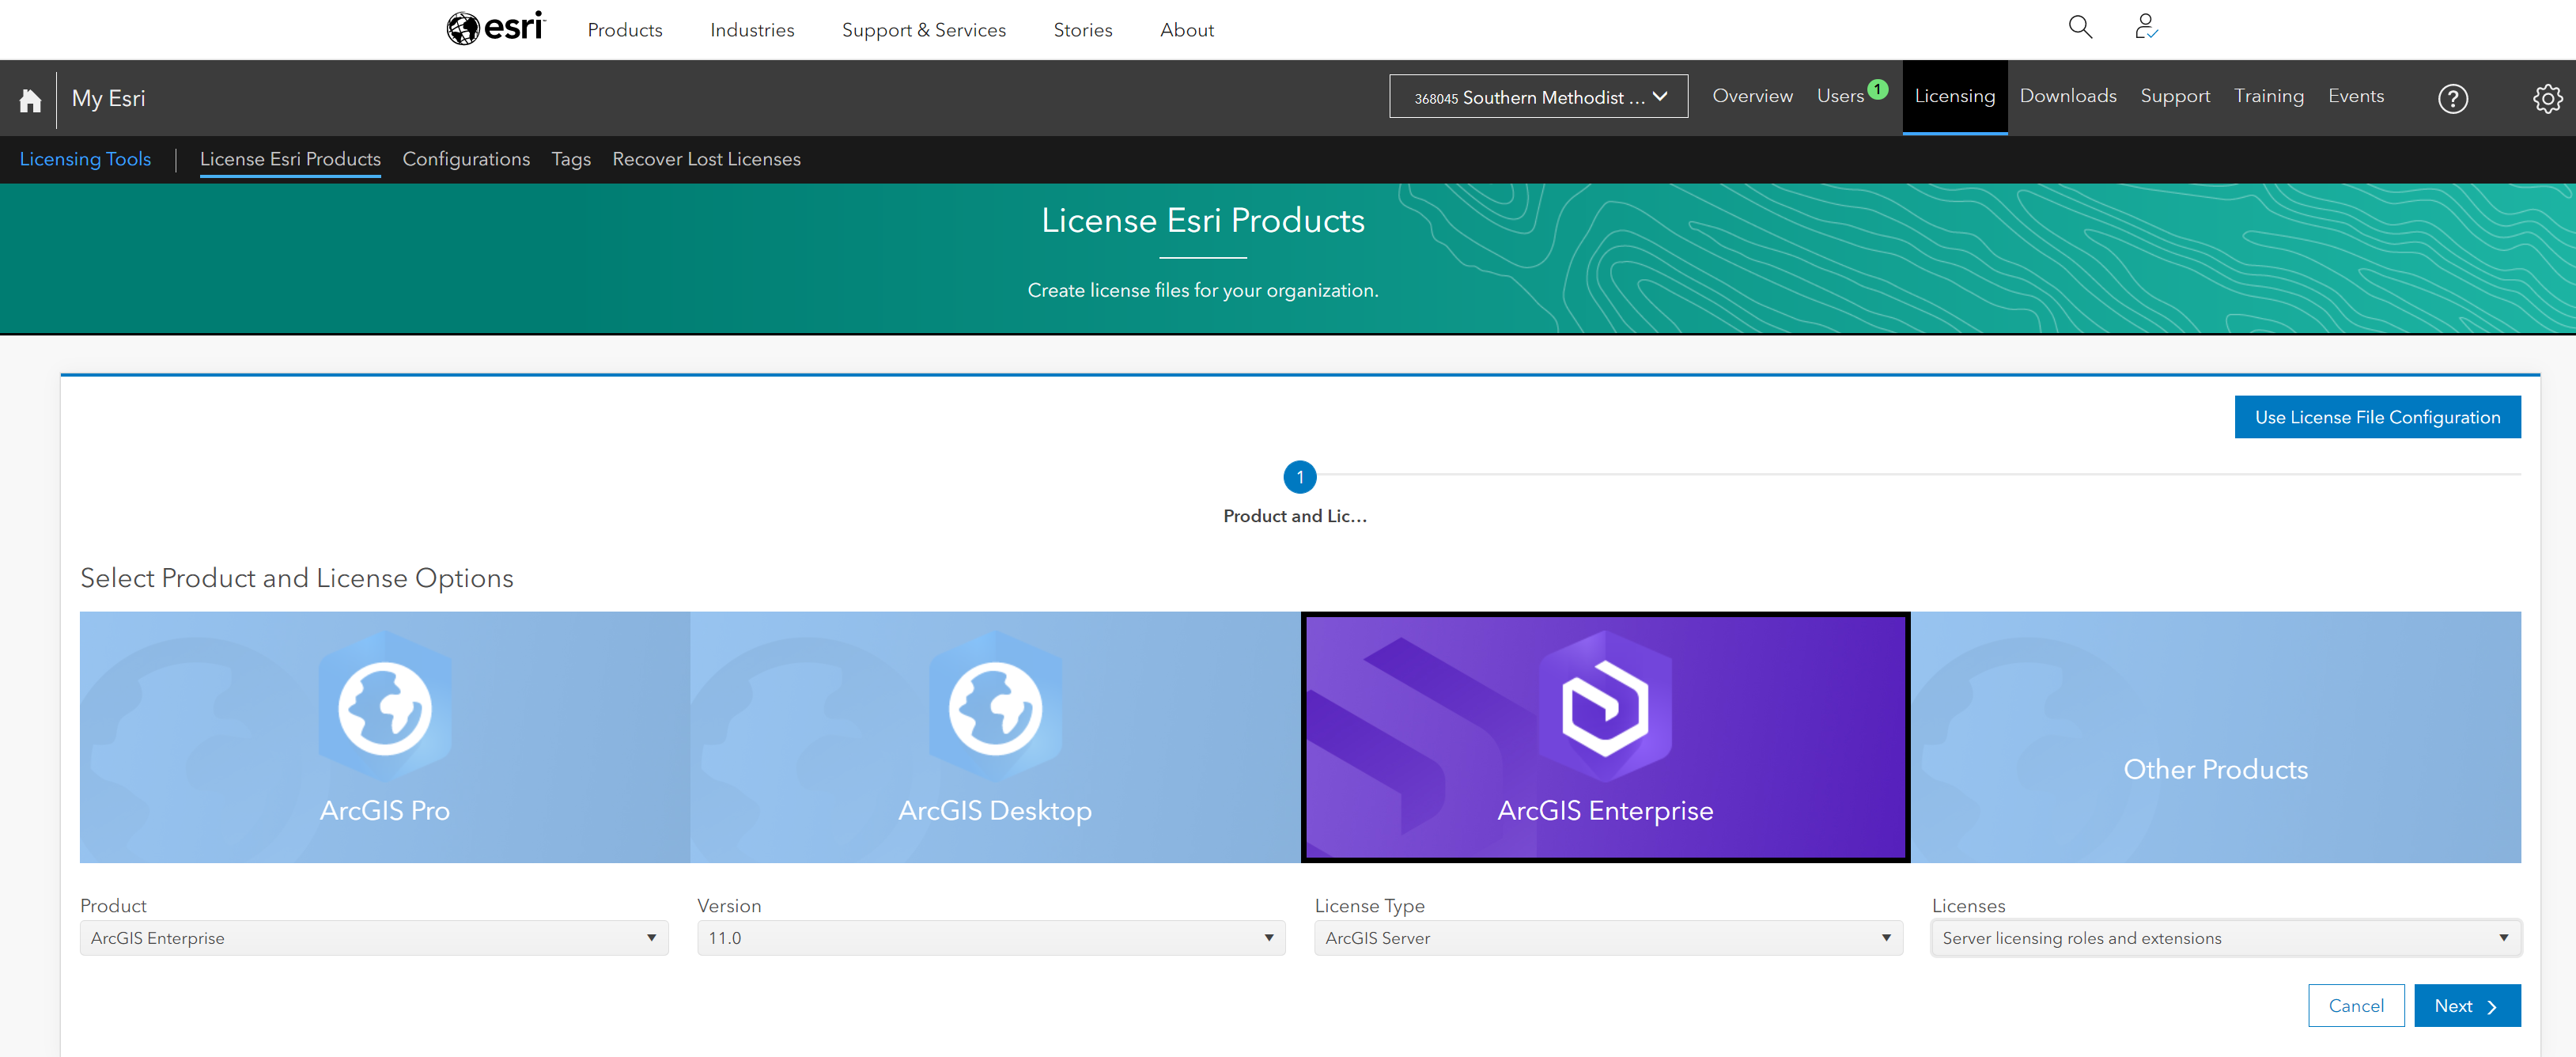
Select the appropriate license:
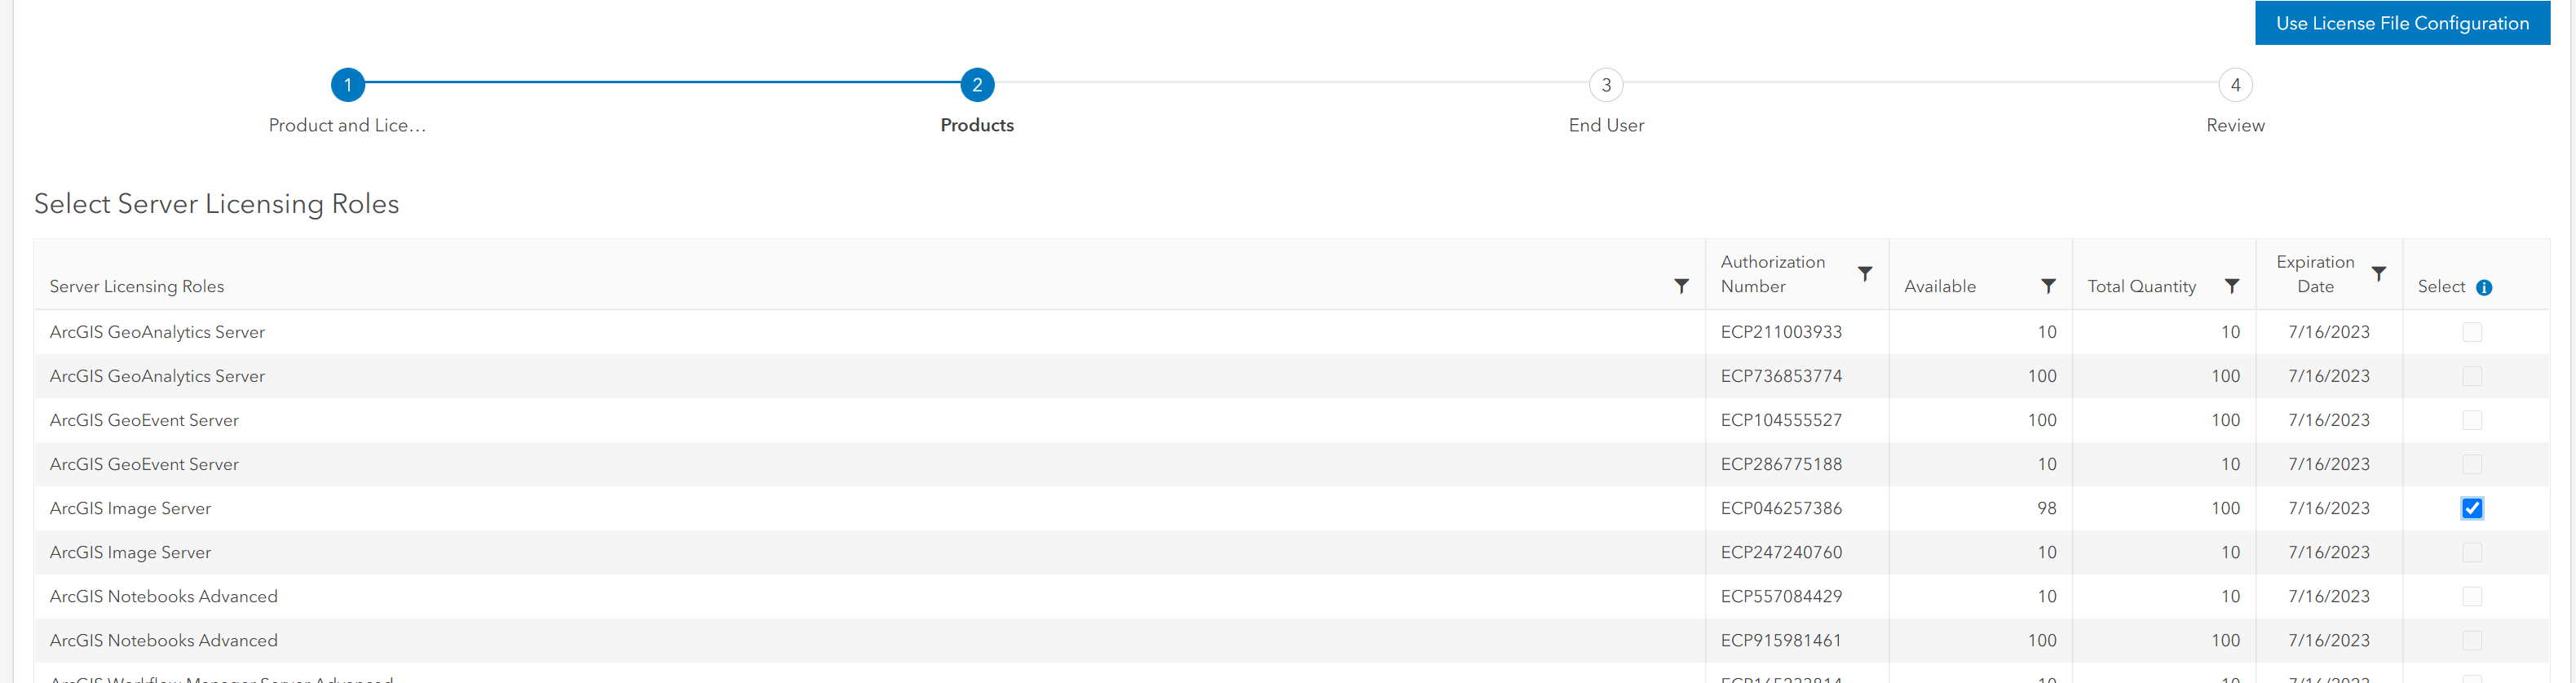
Download the license file:
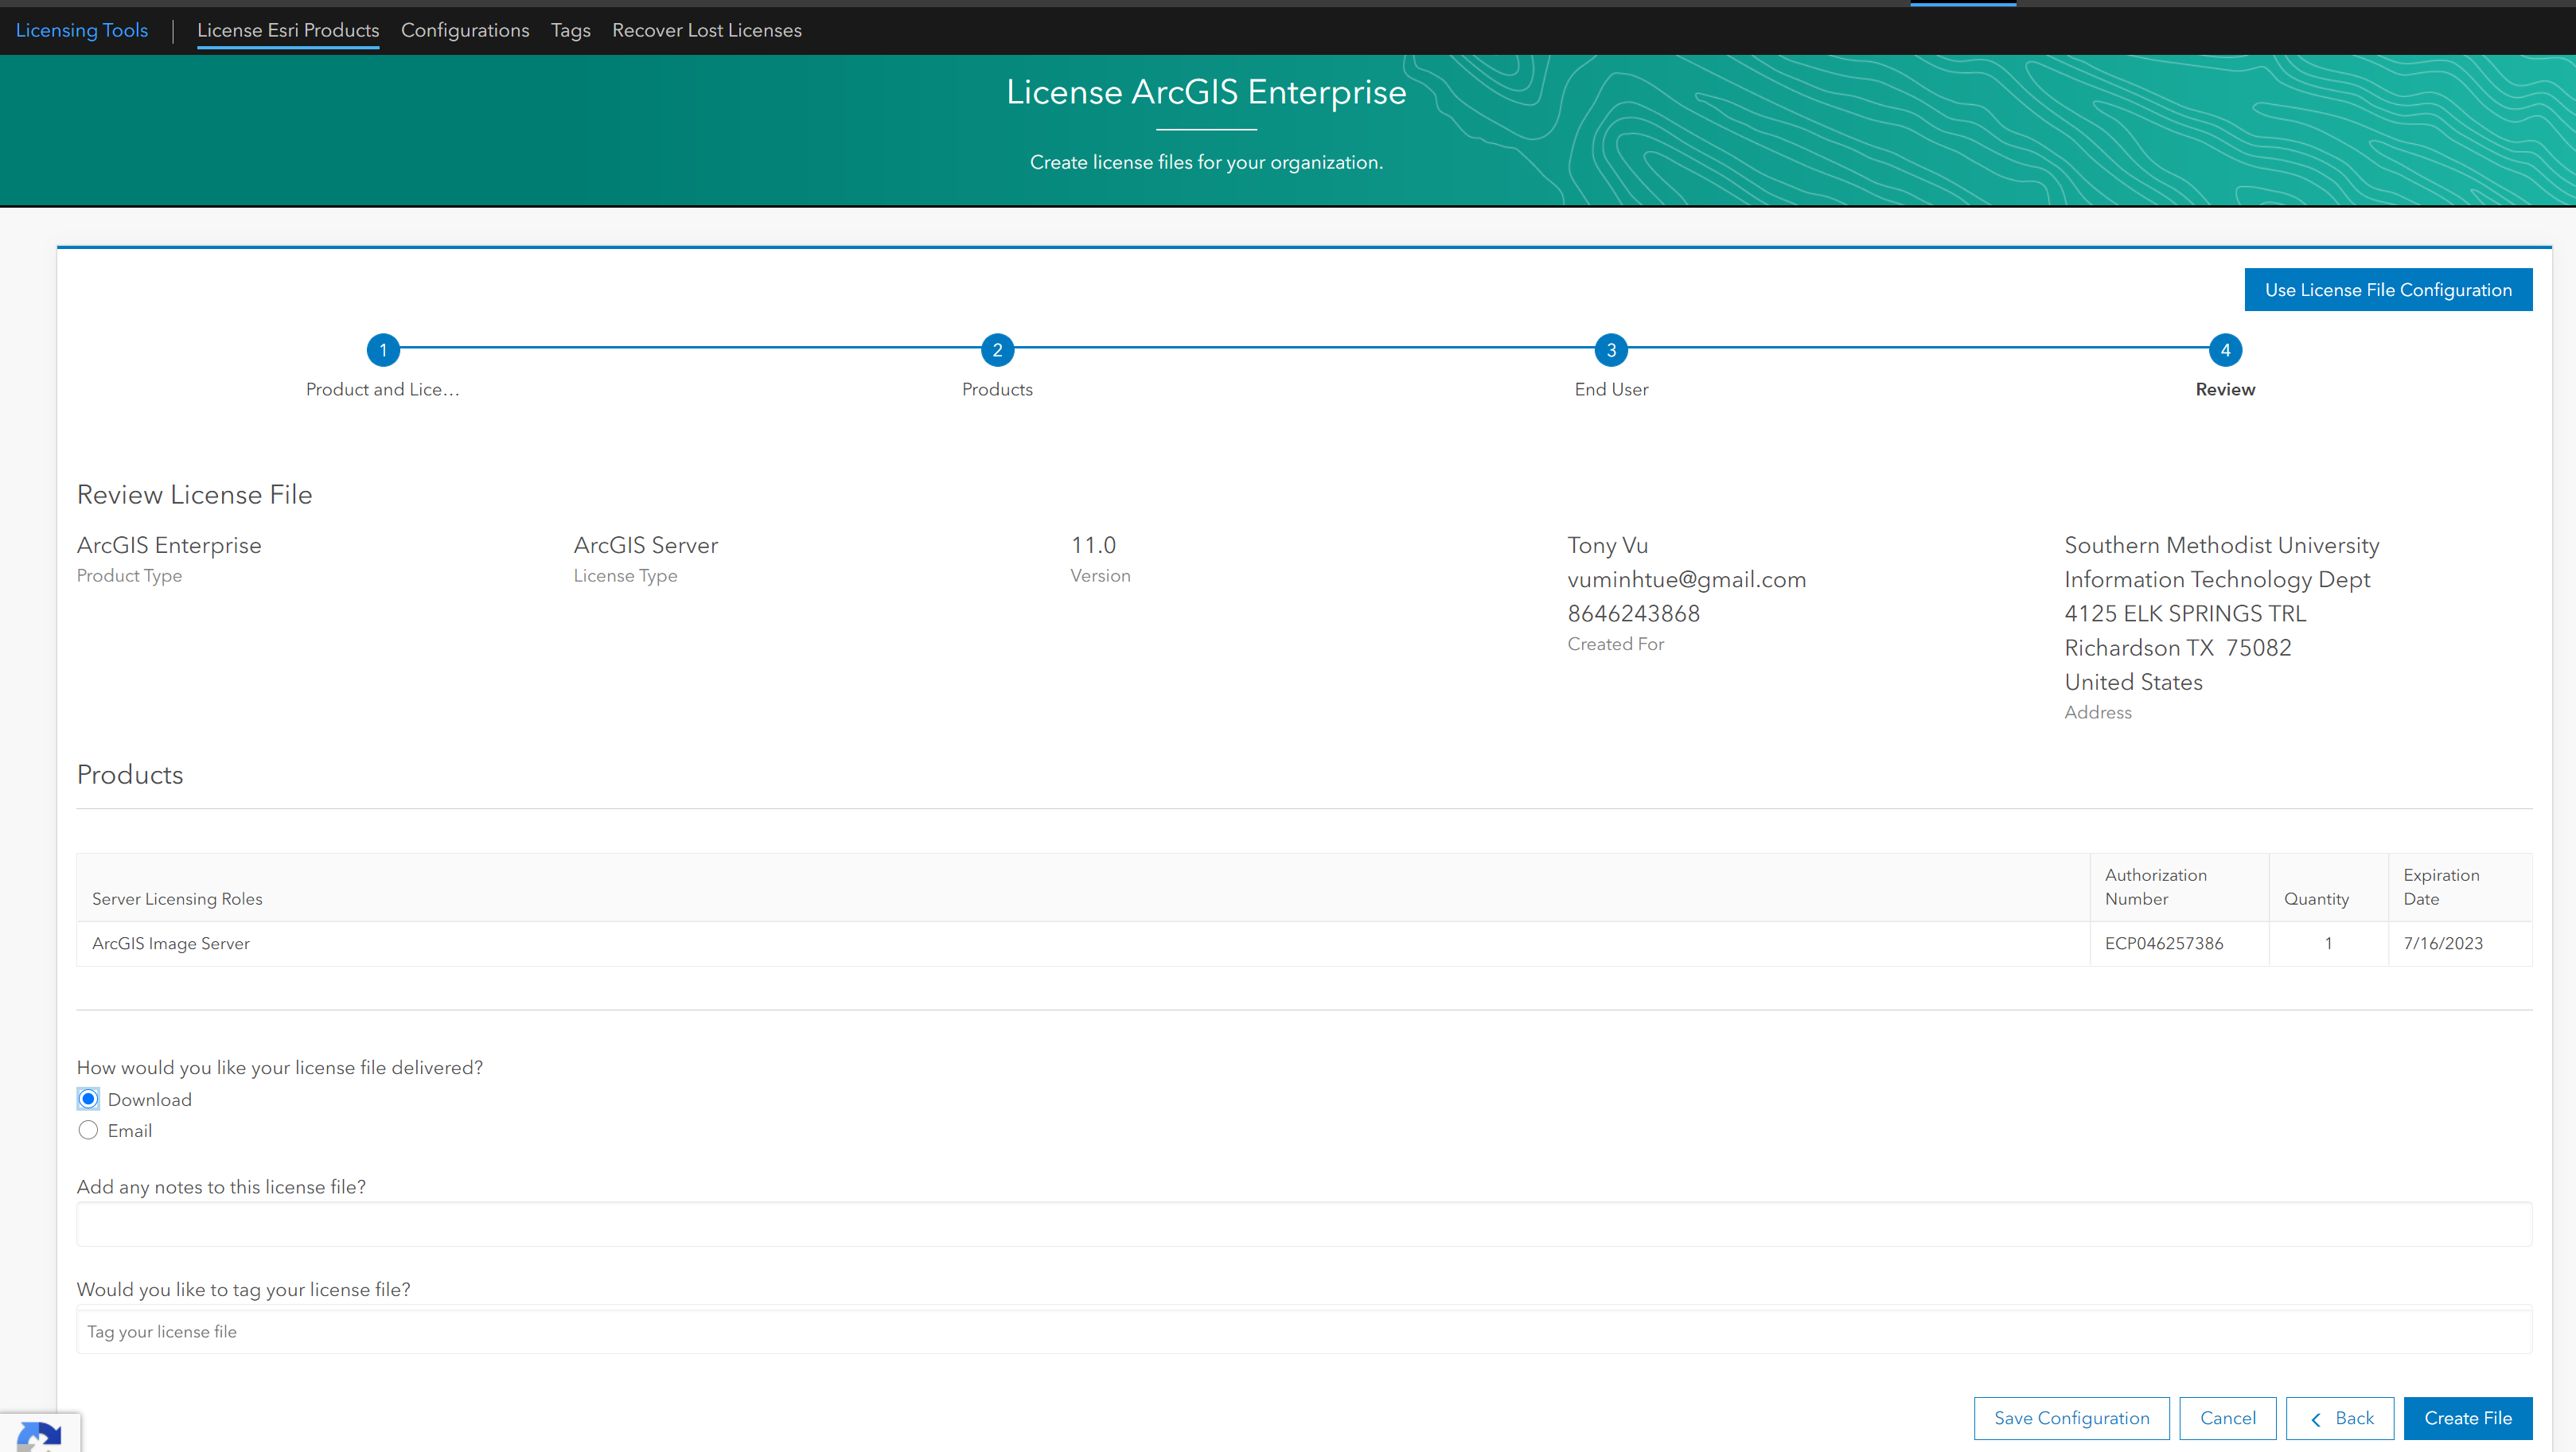
Save it somewhere, for example: ArcGISImageServer_ArcGISServer_1007035.prvc
Step 2. Download ArcGIS Server:
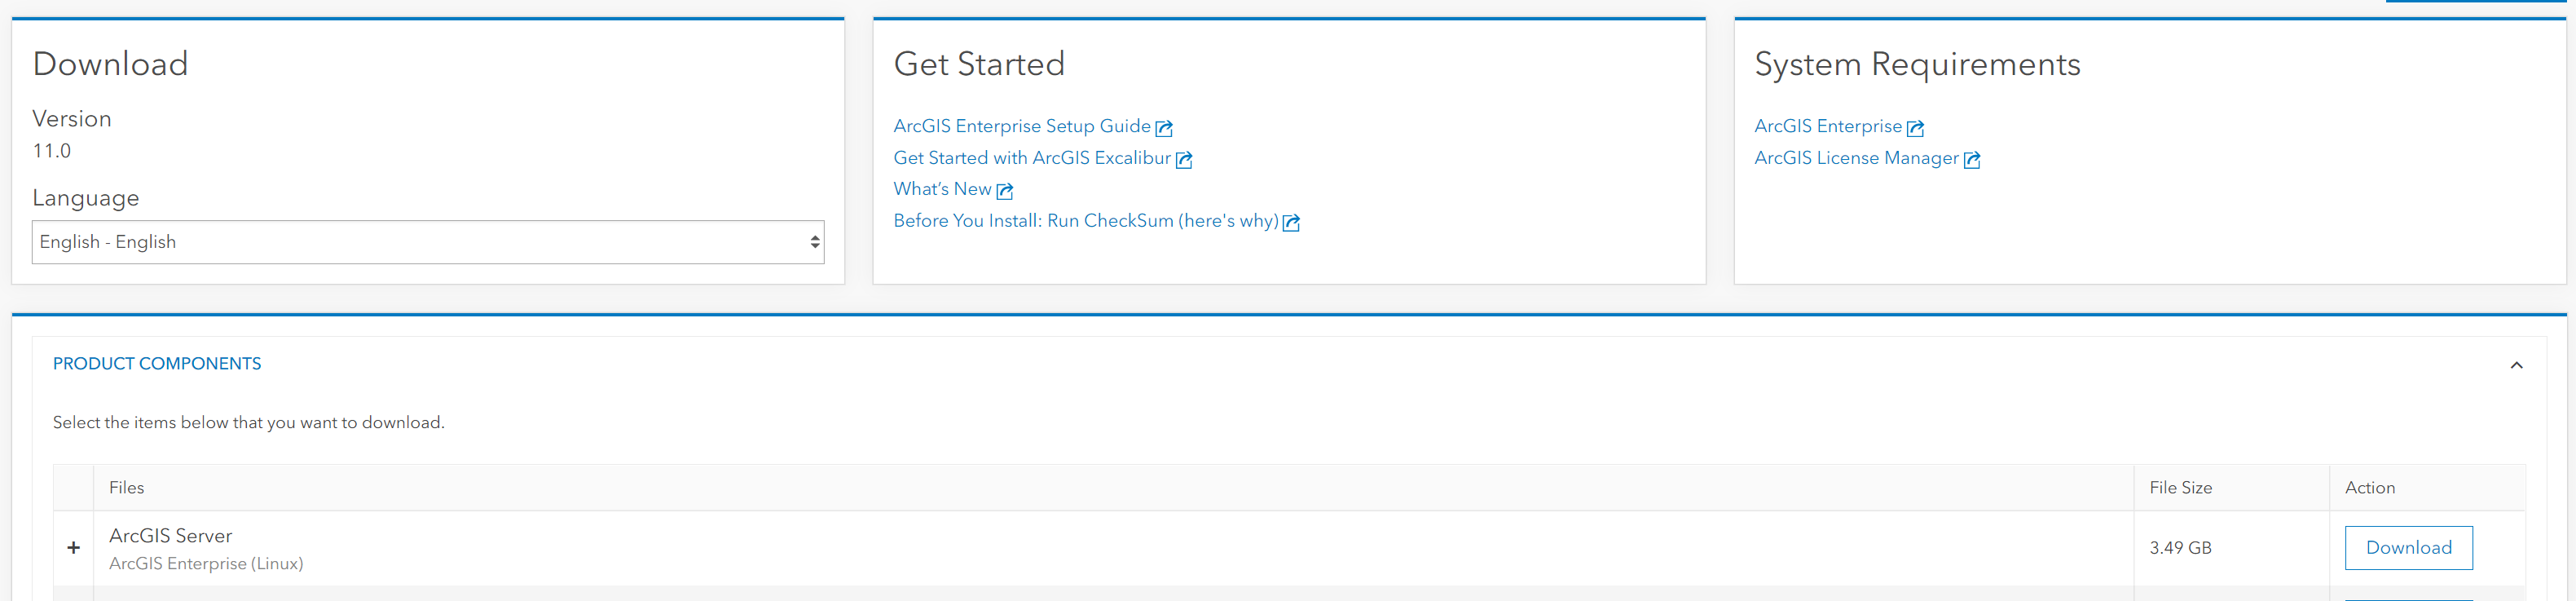
Hover to Downloads tab and select ArcGIS Enterprise Linux to download to M2:
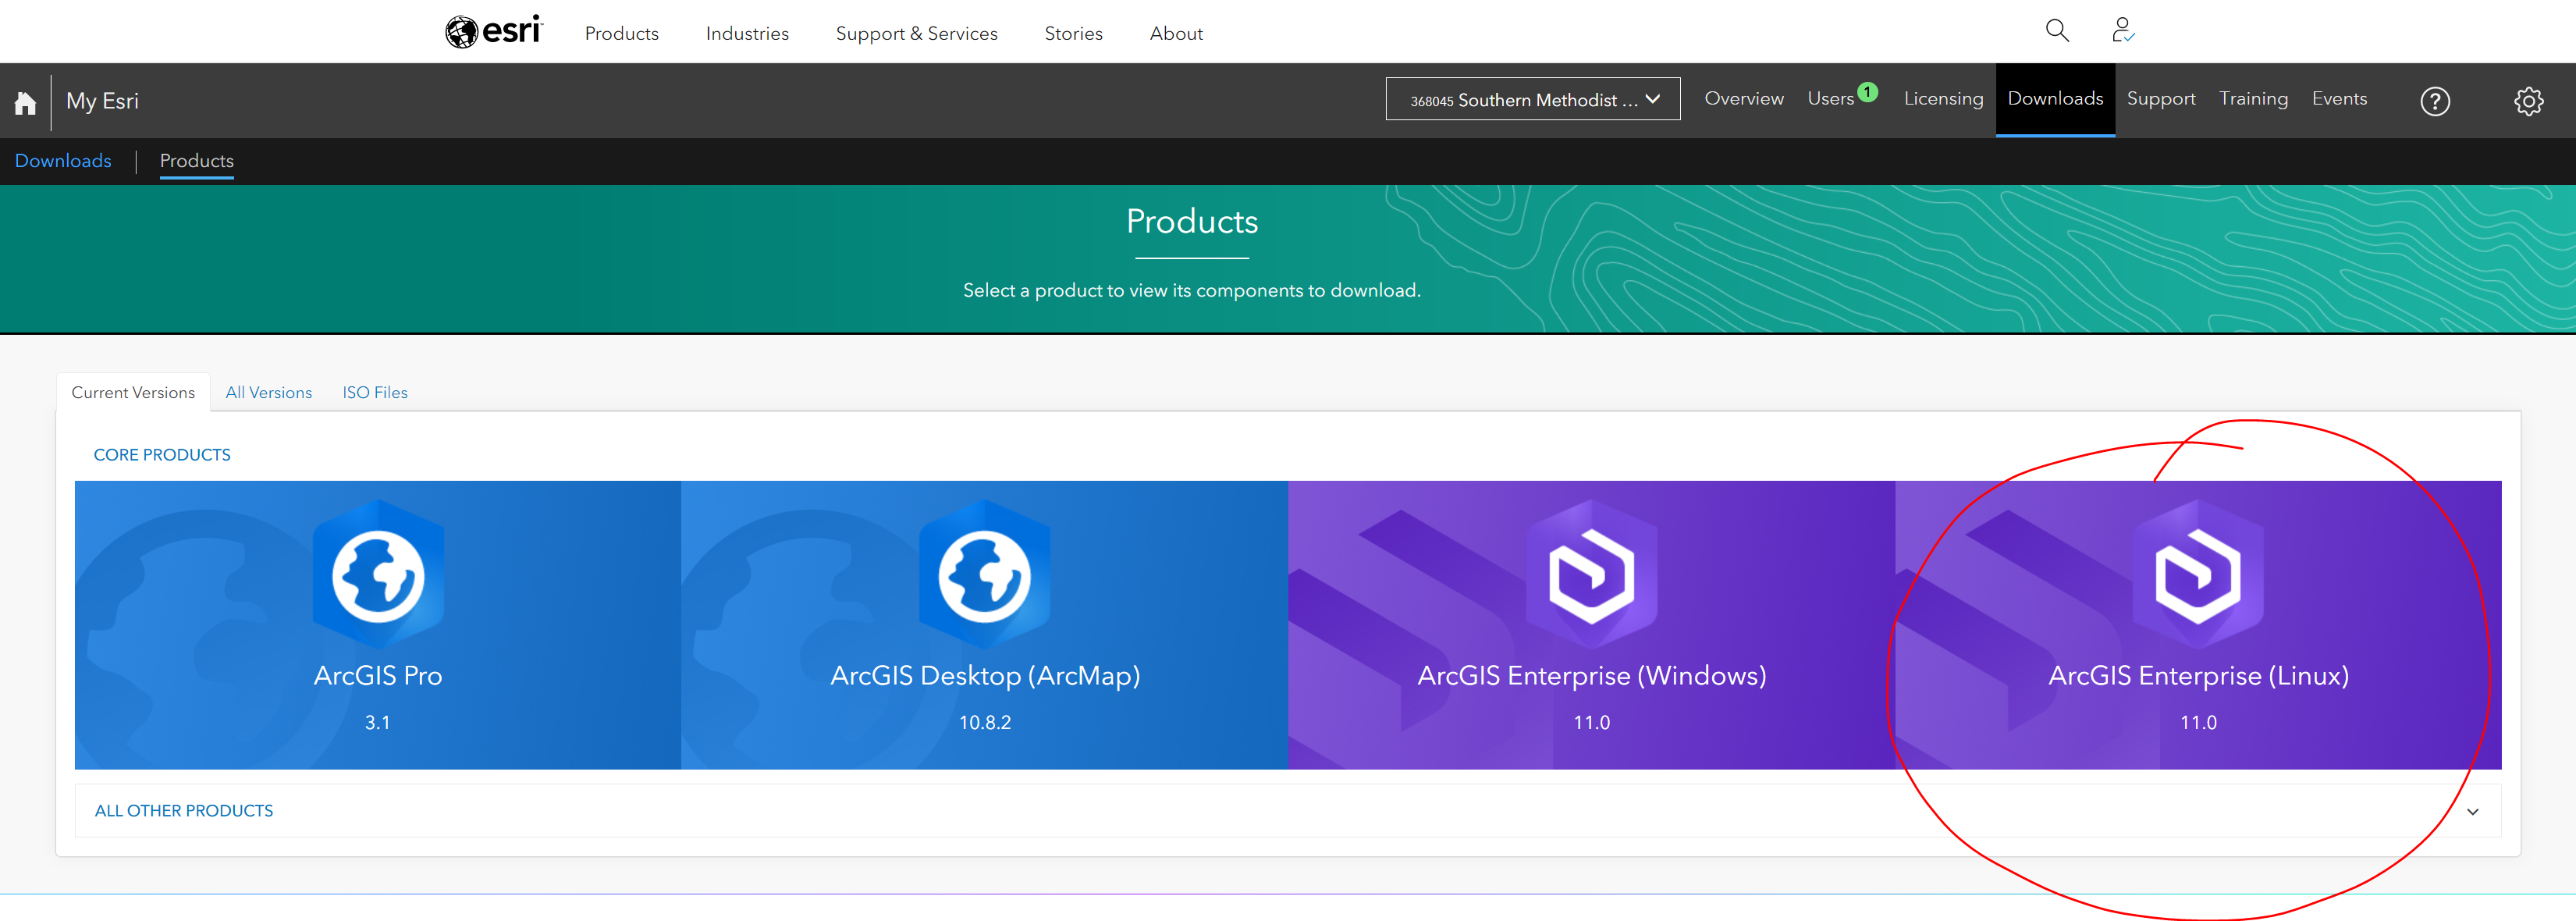
Here I download version 11.0 at the time of writing this document:
Step 3. Setup ArcGIS Server:
Request a compute node, here I use va001 all the time.
$ ssh -X va001
Sometime you may need to change the Soft and Hard limitation of the node using: Check with Amit or Richard should you need help with the node:
$ ulimit -Hu 26000
$ ulimit -Su 26000
Navigate to installation folder and run Setup file:
$ ./Setup
Step 4. Authorize the license file:
There are 2 ways to authorize the license file from step 1.
Method 1: Using GUI:
- Request a compute node with GUI
- Go to /work/users/tuev/arcgis/server/tool
- Run authorizeSoftware in GUI and select the ArcGISImageServer_ArcGISServer_1007035.prvc from your directory. Check your information and authorize it.
- Make sure that all tick marks are checked for the authorization:
- Testing by running:
$ ./authorizeSoftware -s
Method 2: using silent mode.
$ ./ authorizeSoftware <-f .prvc> <-e email> <-o filename.txt>
Upload the filename.txt to esri website (following its instruction) to obtain the license file: authorization.ecp Validate the license:
$ ./authorizeSoftware -f authorization.ecp
Make sure it works:
$ ./authorizeSoftware -s
The GUI appears for you to manually install ArcGIS Server to your /home/username/arcgis directory
Step 5. Install conda environment:
Request a compute node without -X
$ module load python/3
$ conda create -n arcpy_env -c esri arcgis-server-py3=11.0
$ export ARCGISHOME=/work/users/tuev/arcgis/server
$ source activate arcpy_env
$ import arcpy
Test to make sure it works
Step 6. Create Jupyter Kernel:
$ source activate arcpy_env
$ conda install -y -c conda-forge kernda
$ python -m ipykernel install --user --name arcpy_env --display-name "ArcPy11"
$ kernda /users/tuev/.local/share/jupyter/kernels/arcpy_env/kernel.json -o
Modify /users/tuev/.local/share/jupyter/kernels/arcpy_env/kernel.json and make sure the following lines are added:
{
  "argv": [
    "bash",
    "-c",
    "source \"/software/spackages/linux-centos8-x86_64/gcc-8.3.1/anaconda3-5.1.0-c3p5et4cpo7jaiahacqa3pqwhop7tiik/bin/activate\" \"/home/tuev/.conda/envs/arcpy1\" && exec /home/tuev/.conda/envs/arcpy1/bin/python -m ipykernel_launcher -f '{connection_file}' "
  ],
  "env": {"ARCGISHOME":"/work/users/tuev/arcgis/server"},
  "display_name": "MyArcPy510",
  "language": "python"
}
Step 7. Use Port-Forwarding and Request for Jupyter Notebook running on M2/SuperPOD
Key Points
ArcPy